
| Minimum Software Version | 8.15.0 |
| Solution(s) | Hearings ⨉ Cases International ✓ Cases US ✓ Institutions ⨉ Counsel ⨉ |
Configuring a Connection with Relativity
The Relativity Connector is an optional feature that can be added in Opus 2 Case Management. It enables linking an individual Opus 2 project to a Relativity project, allowing imports of documents—including production files and associated metadata - from Relativity.
Note: The Relativity connector must be enabled on your template before it can be configured. Please check with your account manager or Opus 2 Platform Support to confirm that you have access.
Steps to be completed on Relativity side
- Before the integration can be configured, an admin must confirm that the Relativity instance is a supported environment:
Support Environments
Relativity One
Relativity Server 2024-2025 (Previous two versions)
Note that while on-prem instances of Relativity are supported, additional technical configuration may be required to successfully connect. Contact Opus 2 Platform Support for assistance.
- Once it has been determined that the instance is supported, an admin of the Relativity instance must gather the following information:
- The URL of the Relativity instance.
- Authentication credentials (two tokens generated by Relativity: a user ID and a secret). See Relativity Documentation for details on generating these.
- The name of the Relativity project(s) from which you want to pull content.
- The title of the Saved Search(es) within that Relativity project. This pre-existing Saved Search defines which documents are extracted.
- Details of any metadata fields to be mapped from Relativity to Opus 2. You can map specific fields in Relativity to corresponding fields in Opus 2.
Creating the Oauth2 Client
As item 2b states above, an admin of the Relativity instance needs to generate a Client ID and Client Secret by creating an OAuth2 client.
- To create the OAuth2 client, reference the following article from Relativity's support site: OAuth2 clients
- Choose the following when configuring:
- Enabled — Toggled On
- Flow Grant Type — Client Credential
- Keep in mind that the OAuth2 client requires the selection of a Context User...
- Choose the following when configuring:
Choosing/Creating a Context User
When creating an OAuth2 client on the Relativity instance, you are required to choose a Context User. The permissions of this user account directly controls what the Opus 2 user is able to see/pull through the integration.
Because of this, admins of the Relativity instance often create a dummy user account for their Context User as they can update and restrict integration permissions. This is especially useful for Relativity vendors that host multiple clients on their instance. By utilizing a dummy user, vendors can ensure that Opus 2 does not have access to data outside of the client use case.
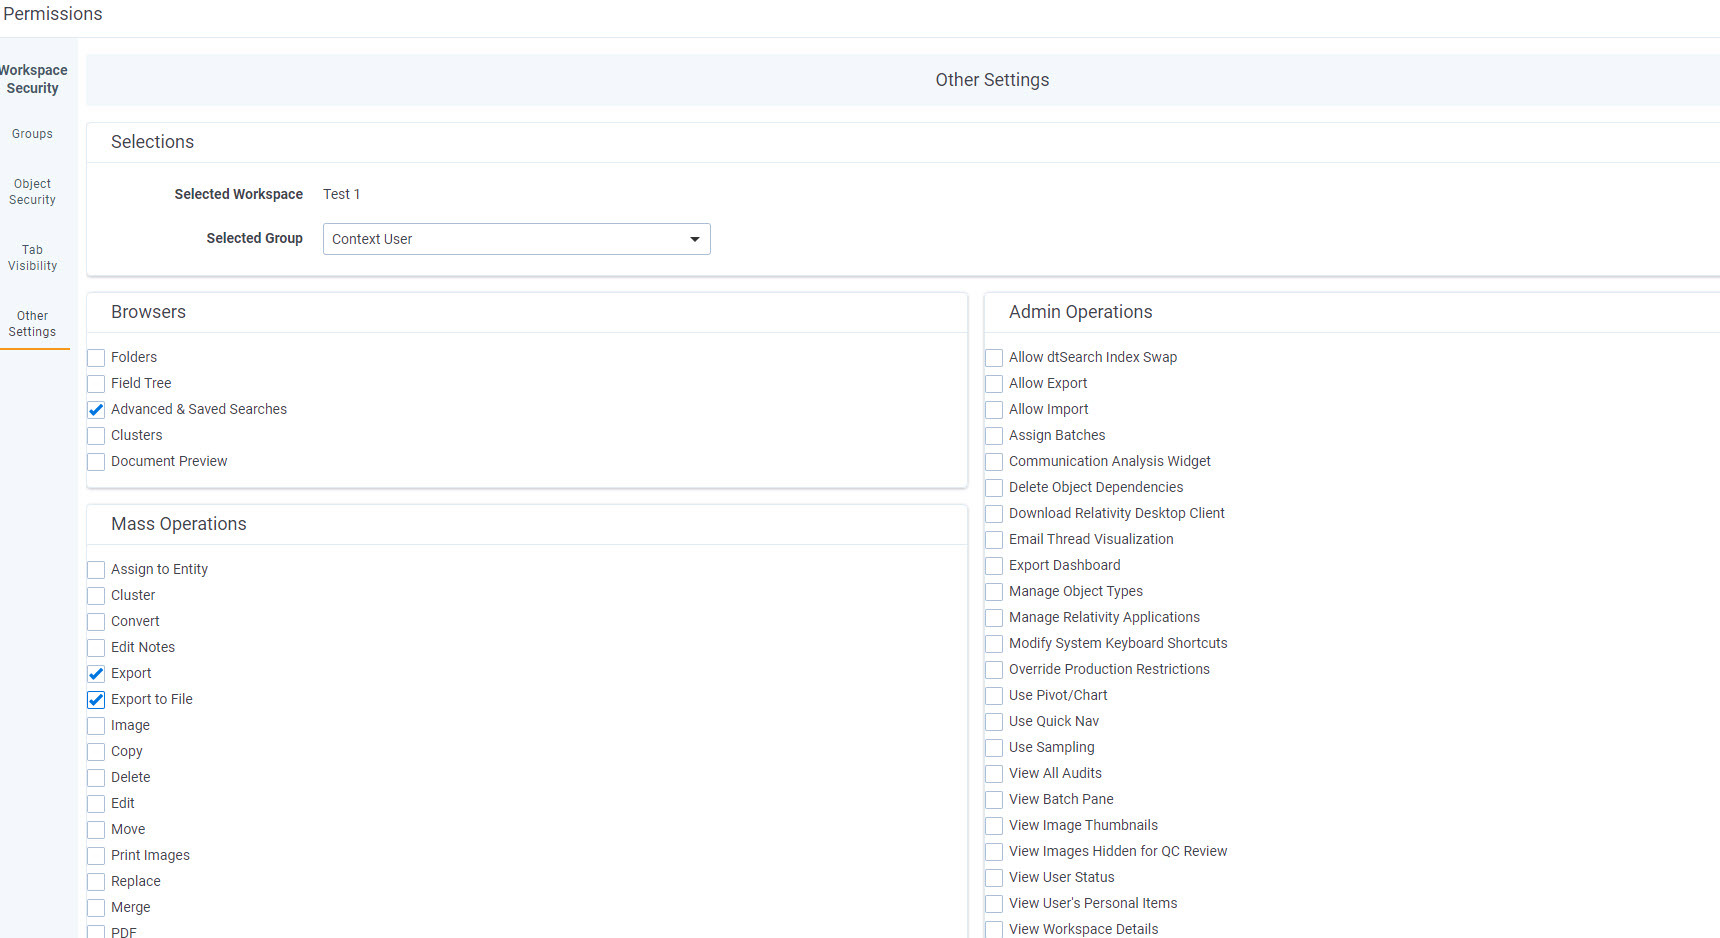
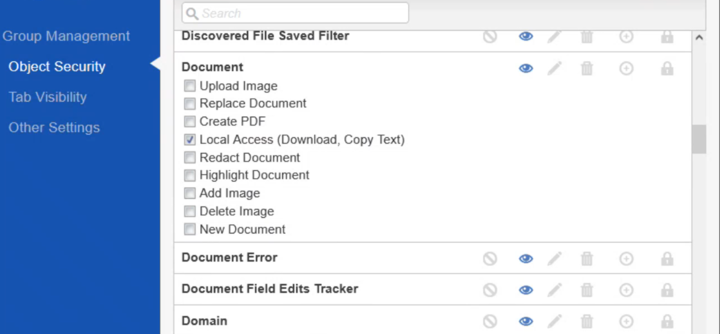
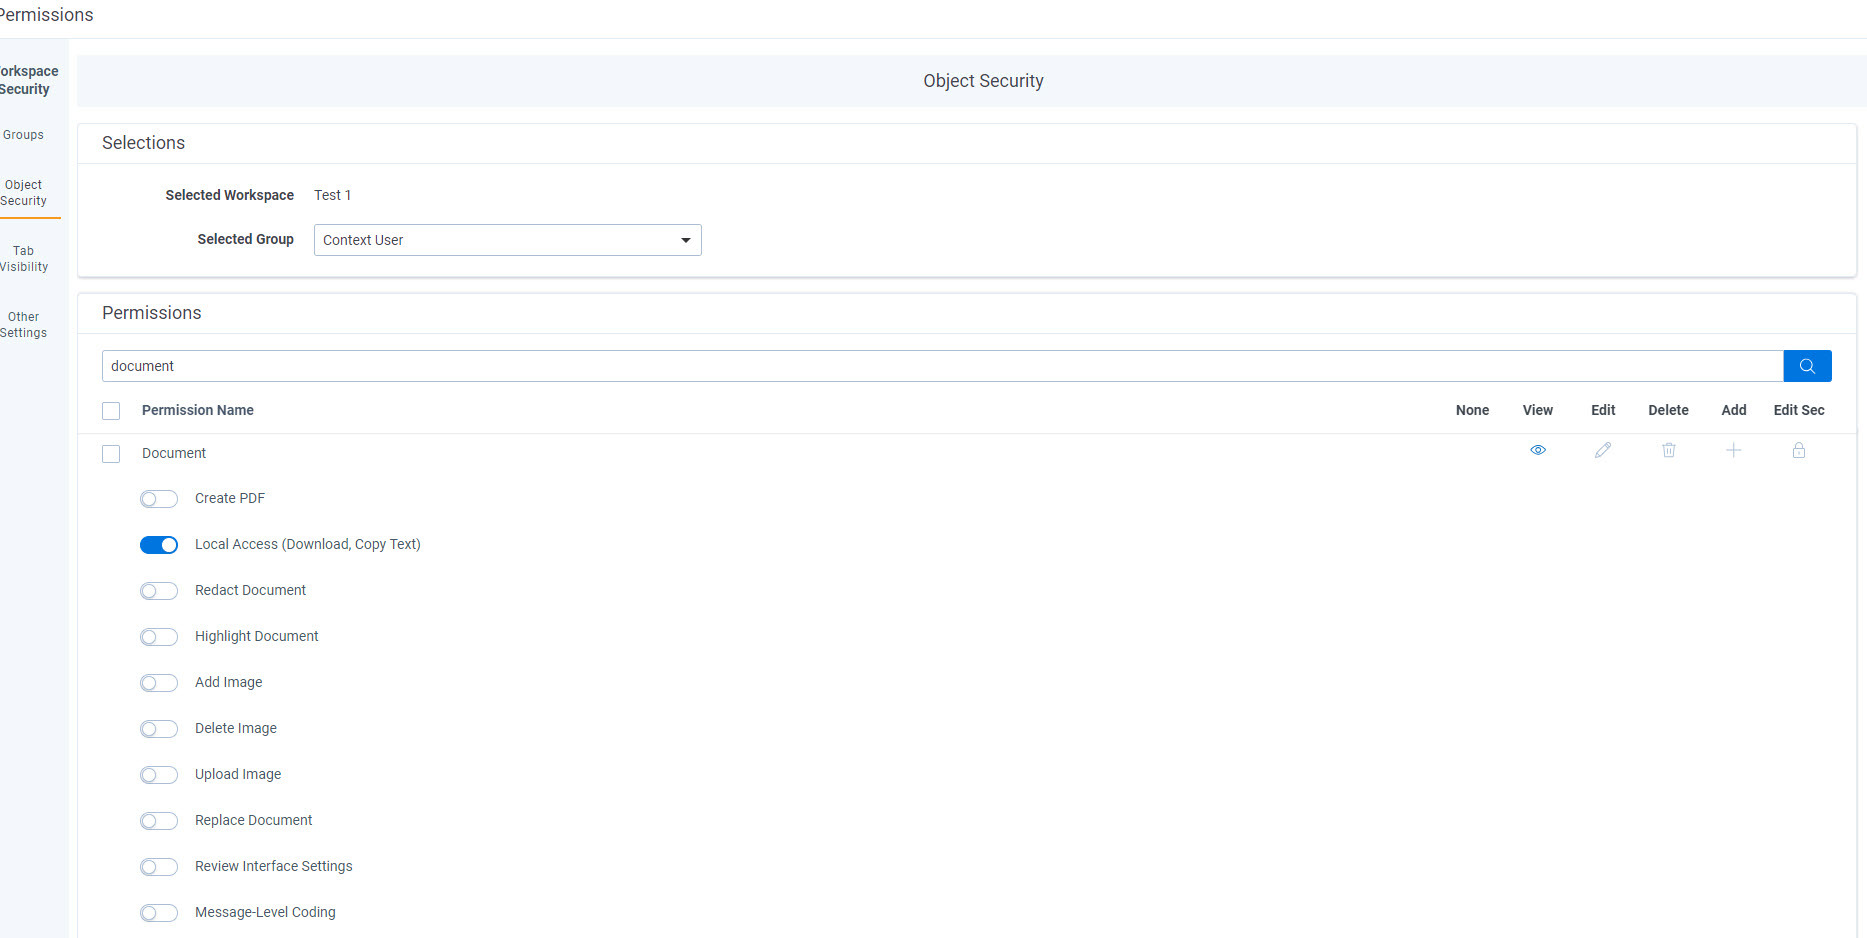
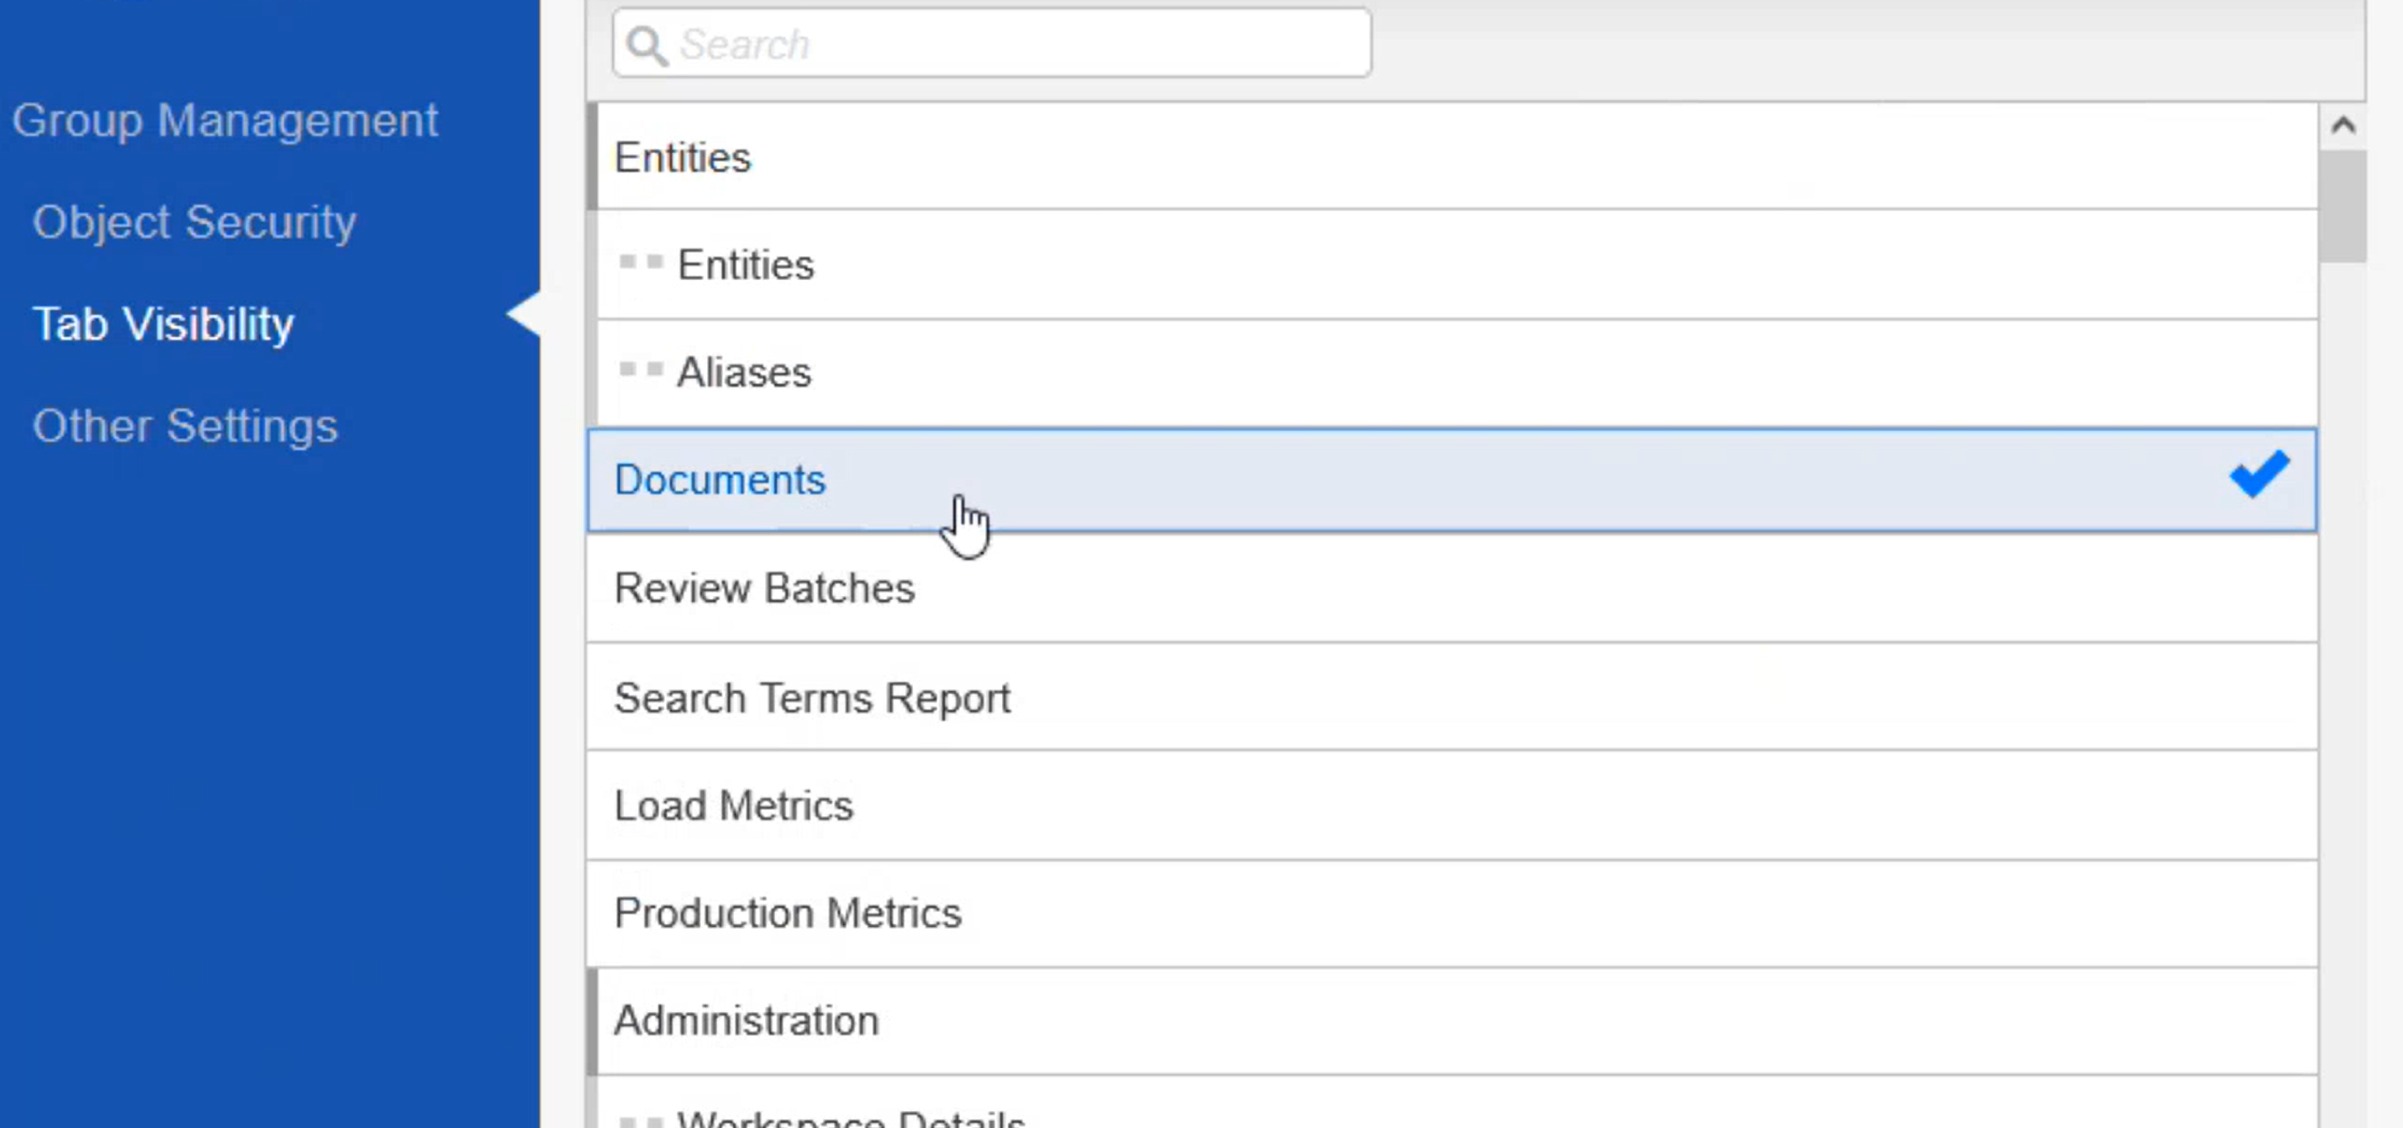
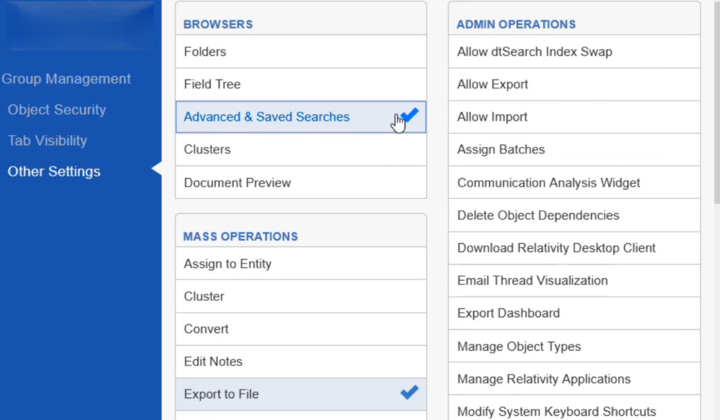
To ensure that users can successfully pull files and metadata through the integration, however, the Context User chosen must have the below minimum permissions. Failure to enable these settings prevents the integration from running on the Opus 2 Platform.
Relativity One | Relativity Server |
Other Settings Browsers
Mass Operations
 | Object Security Document
|
Object Security Document
| Tab Visibility
|
(Other Settings) Browsers
Mass Operations
|
Testing the Connection
Now that the OAuth2 client properly configured with the Context User, it is time to test the connection within Opus 2. As a System or Project Admin within Opus 2...
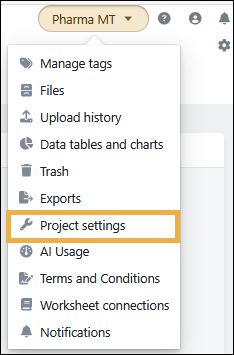
- Go to the Project settings option in the main project menu.
- Navigate to the Integrations menu tab.
- Select Add New Integration and then select Relativity from the drop-down menu.
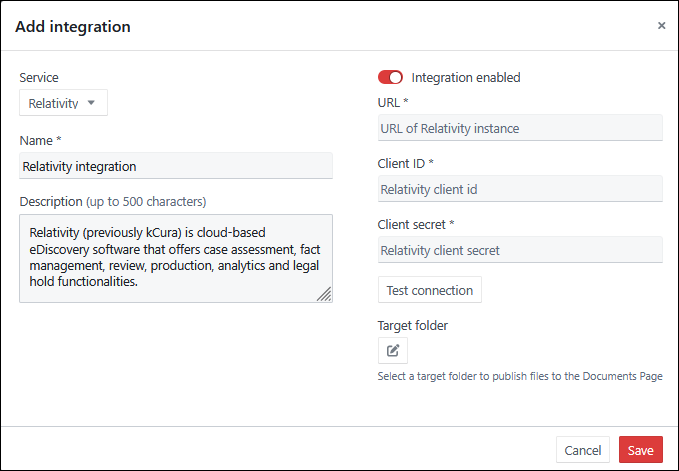
- Enter a Name, and optionally, a Description. These details are used to identify different connections if you have more than one.
- Enter the URL of the Relativity instance you want to connect to, for example: https://relativity.example.com/Relativity/
- Client ID and Client Secret to connect to your Relativity instance. The Client ID / Client Secret need to be generated on your Relativity Instance by an admin.
- Select Test Connection. You are looking for a Connected message to confirm all above details are correct.
Troubleshooting a Connection Failure
If you receive a Connection Failed message after completing these steps, the following items should be confirmed before reaching out to Opus 2 Platform Support:
- The OAuth2 client is set to Enabled on the Relativity instance.
- The URL of the Relativity instance is correct - removing unnecessary or incorrect characters from the URL.
- The Client ID and secret are correct - Copying and pasting these details from different sources may introduce incorrect characters.
- Particularly for clients utilising on-premise Relativity Server instances, the instance allows the specific HTTPS traffic for Relativity’s REST API architecture. The following are the necessary Relativity API Endpoints:
| Category of use | Endpoint used |
1. While creating relativity integration | Relativity/Identity/connect/tokenapi/Relativity-Identity/v1/workspaces/-1/users/meAPI/Relativity.Services.ItemListView.IItemListViewModule/Item List View Manager/GetViewDataForDropDownAsyncAPI/Relativity.HomePage.Services.Interfaces.IHomePageModule/WorkspaceService/queryslimapi/Relativity-Identity/v1/users/query-eligible-groupsAPI/relativity-environment/v1/workspace/query-by-groupquery-eligible-saved-searchesapi/Relativity.Services.Search.ISearchModule/Keyword Search Manager/ReadSingleAsyncapi/Relativity.ObjectManager/v1/workspace/{workspace id}/object/queryslimapi/relativity-object-model/v1/workspaces/{workspace id}/documents/{document id}/file-info |
2. When syncing files | api/Relativity.ObjectManager/v1/workspace/{workspace id}/object/queryslimapi/Relativity.Objects/workspace/{workspace id}/object/queryapi/relativity-object-model/v1/workspaces/{workspace id}/documents/{document guid}/file |
Related articles
Relativity Integration: Quick Start Guide
Related documentation
Opus 2 has help information accessible within the application; click the question mark and then select Documentation in the upper-right area of the platform. You can also access the documentation at: Opus 2 Support.
How to contact us
To contact us about the documentation, or if you have any other questions or issues about Opus 2 solutions, contact Opus 2 Platform Support by emailing Opus 2 Platform Support.