
| Minimum Software Version | 8.18.5 |
| Solution(s) | Hearings ⨉ Cases International ✓ Cases US ✓ Institutions ⨉ Counsel ✓ |
Explains how to configure the Chronology, Characters, and Organisations worksheets to allow AI Workbench to associate multiple sources and highlighted text passages with an entity.
By default, AI Workbench associates the first source from merged records with a worksheet record, along with a single highlighted text passage per entry. From release 8.18.5 onwards, the platform can be configured to allow AI Workbench to associate multiple sources and multiple highlighted passages of text with a single entity (Character, Chronology, Organisation). This article covers the full configuration for all three worksheets.
Chronology worksheet
Edit the Source subtype
Note: The Chronology worksheet typically has a Sources subtype already configured. If it does not, follow the steps for Characters and Organisations below to create one first.
Add a Highlighted Text field to the Chronology Sources subtype
- Select the Chronology tab.
- Select Edit > Subtypes > Source.
- Select the Fields tab of the Chronology Source subtype.
- Select File field – text in a document and name it Highlighted Text.
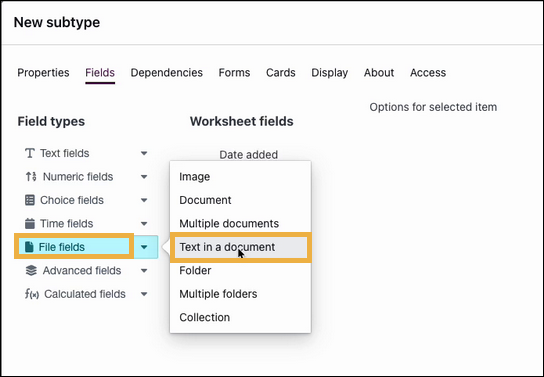
- Ensure the Highlighted Text field is marked as applicable to transcripts (required for US-based users).
- Locate the existing Source field and mark it as Not Required.
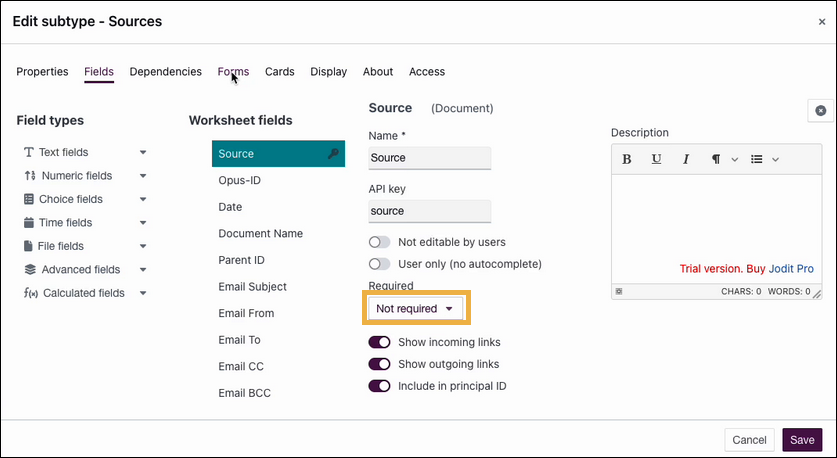
Note: If a Source subtype already exists, the Source field was used to attach a full document. This new configuration adds multiple highlighted text passages, so the existing Source field must be marked as Not Required to avoid interference.
Clean up fields
Review the Sources subtype and remove any redundant fields. The fields required for this configuration are:
| Field name | Field type | Description | (Derived only) Source | (Derived only) Field to use | Principal ID |
|---|---|---|---|---|---|
| Source | Document | Document field for entry of a full document as the source | Selected | ||
| Highlighted text | Text in a document | Allows linking of highlighted text from documents and transcripts | |||
| Source Opus ID | Derived field | Derived field for source document Opus ID | Source | Opus ID | |
| Source document name | Derived field | Derived field for source document name | Source | Document name | |
| Source date | Derived field | Derived field for source document date | Source | Date | |
| Source description | Derived field | Derived field for source document description | Source | Description | |
| Highlighted source Opus ID | Derived field | Derived field for highlighted source Opus ID | Highlighted text source | Opus ID | |
| Highlighted source document name | Derived field | Derived field for highlighted source document name | Highlighted text source | Document name | Selected |
Add the Highlighted Text field to relevant forms and cards
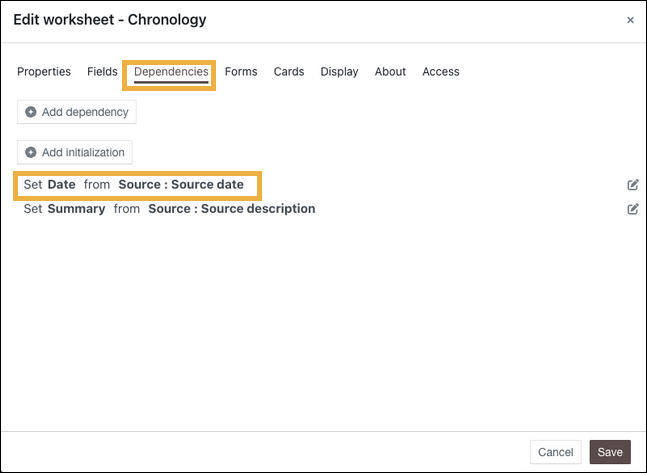
- While editing the Chronology worksheet, navigate to Dependencies. Ensure the Chronology date field is set to initialise from the Source date field in the subtype.
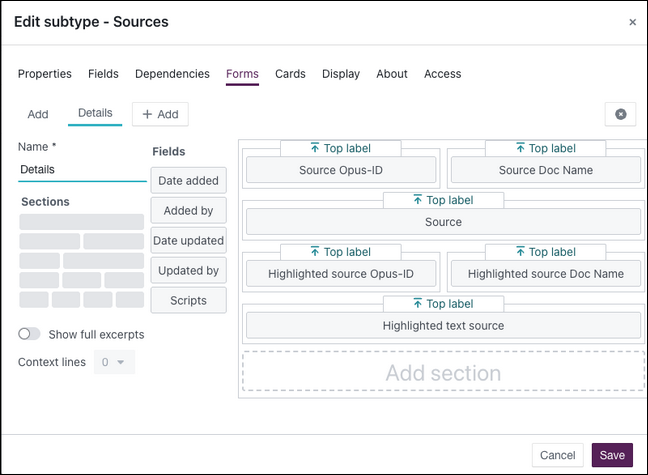
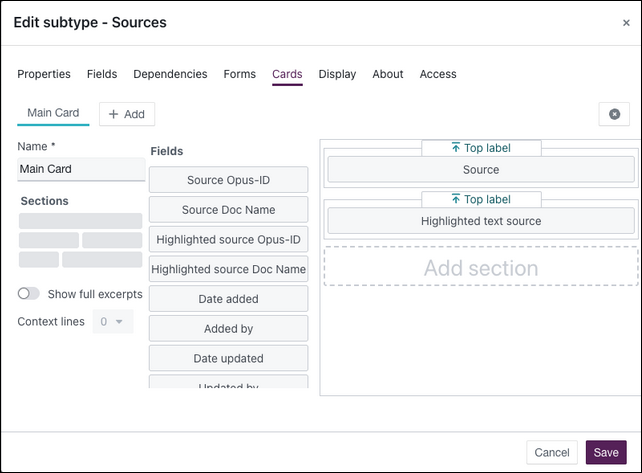
- Add the new Highlighted Text field to all relevant forms and cards within the subtype so that users can view and edit the captured text. Add it to the following:
- Add form
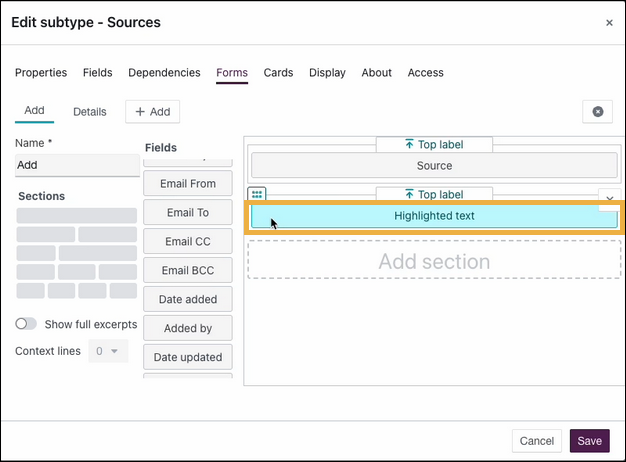
- Details form
- Main card
- Add form
- Select Save to save your changes to the Chronology Source subtype.
Characters worksheet
Create a Sources subtype
Characters does not have a Sources subtype by default. To enable multiple source records to be associated with a Character record, create one as follows:
- Select the Characters tab.
- Select Edit > Subtypes > Add Subtype.
- Set the Subtype name to
Sources. - Set the Record name to
Source. - Set Primary sort > Field to Opus ID from the dropdown list.
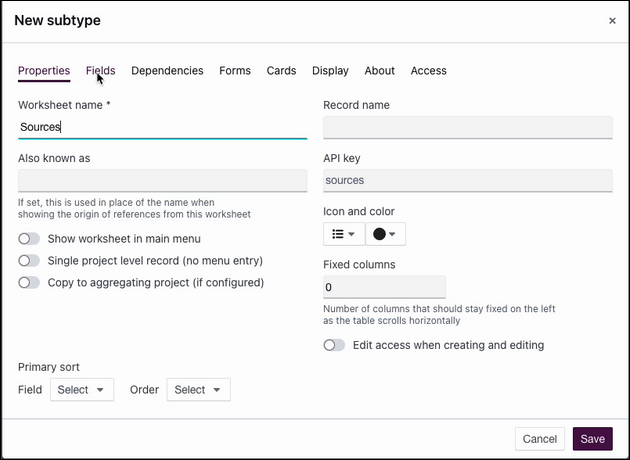
Add a Highlighted Text field to Character sources
- Select the Fields tab of the Character Source subtype.
- Add the following fields to replicate the Sources configuration from the Chronology worksheet:
| Field name | Field type | Description | (Derived only) Source | (Derived only) Field to use | Principal ID |
|---|---|---|---|---|---|
| Source | Document | Document field for entry of a full document as the source | Selected | ||
| Highlighted text | Text in a document | Allows linking of highlighted text from documents and transcripts | |||
| Source document Opus ID | Derived field | Derived field for source document Opus ID | Source | Opus ID | |
| Source document name | Derived field | Derived field for source document name | Source | Document name | |
| Highlighted source Opus ID | Derived field | Derived field for highlighted source Opus ID | Highlighted text source | Opus ID | |
| Highlighted source document name | Derived field | Derived field for highlighted source document name | Highlighted text source | Document name | Selected |
Add the Highlighted Text field to relevant forms and cards
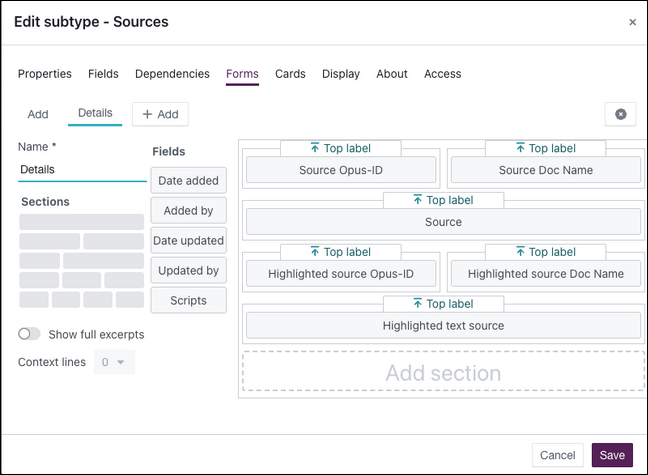
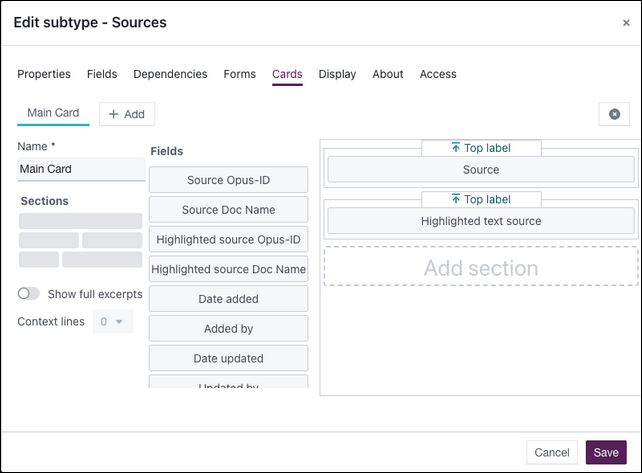
- While editing the Characters subtype, add the new Highlighted Text field to all relevant forms and cards so that users can view and edit the captured text. Add it to the following:
- Add form
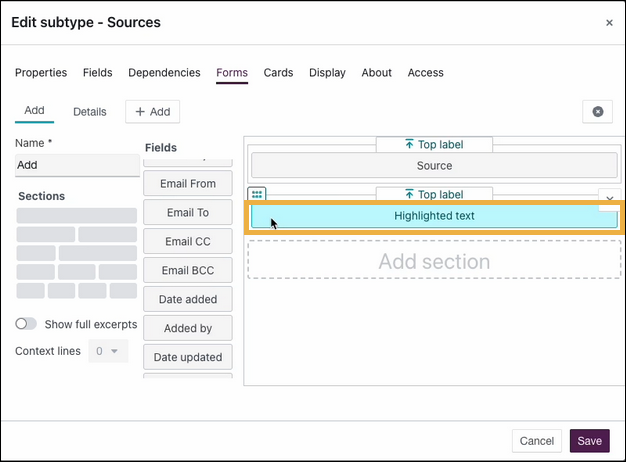
- Details form
- Main card
- Add form
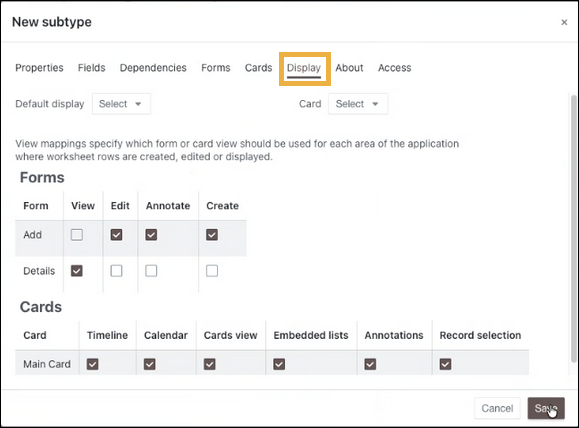
- Set the display settings for the Sources subtype as required.
- Select Save to save the new Sources subtype for Characters.
Enable multiple source sub-records for Characters
- On the Characters worksheet, select Edit > Edit worksheet.
- Select the Fields tab.
- Select Advanced field > Multiple sub-records.
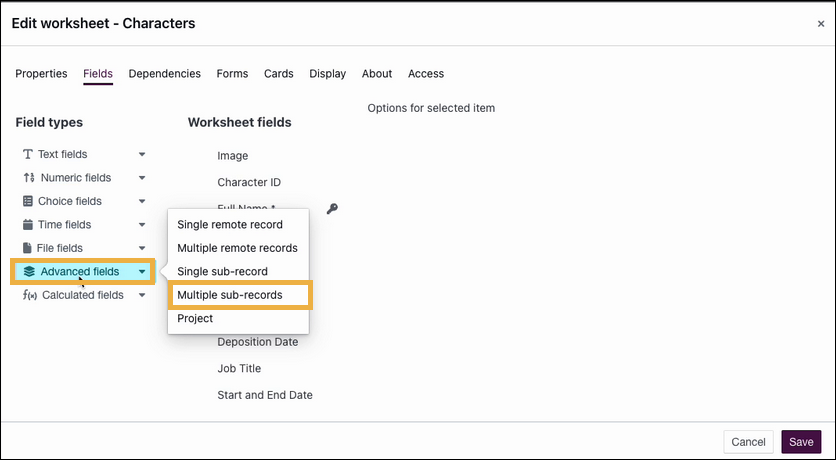
- Name this advanced field
Sources. - Set the Content type to the new Sources subtype you created.
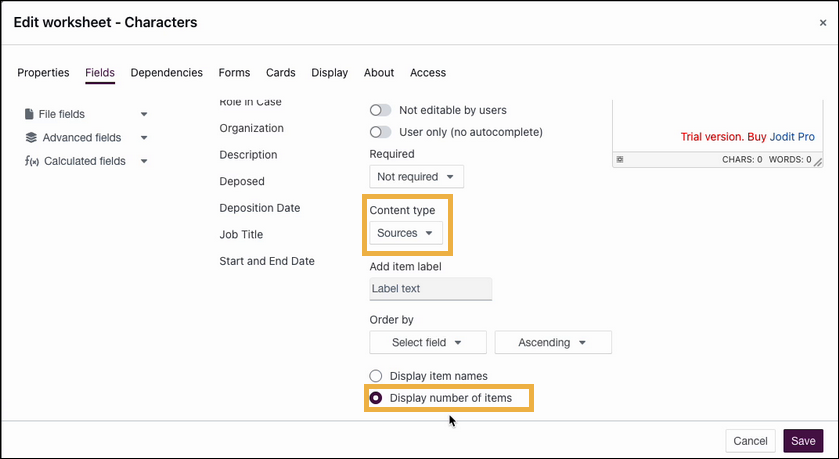
- Select Display number of items.
- Select Save.
Note: If there is only one field with multiple sub-records, the system uses that automatically. If there are multiple sub-records fields, the system looks for a field named Sources.
Organisations worksheet
Repeat the same configuration process for the Organisations worksheet as for Characters, so that it also supports multiple Sources sub-records.
Checking your configuration works
Important: Perform these checks in a sandbox or non-live environment before applying to a live instance.
- In AI Workbench, select a Character, Organisation, and Chronology entry that each have more than one source.
- For each entity type, drag the selected entities into the Merge area.
- Select Combine sources.
- Select the combined source and select Add to worksheet.
- Select Yes, add to worksheet when the confirmation dialog appears. A green success message is displayed.
- Navigate to each worksheet, identify the record that was added, and select it.
- Select the Sources tab in the detailed view.
- Verify that all the Workbench-captured passages of text are associated with the record.
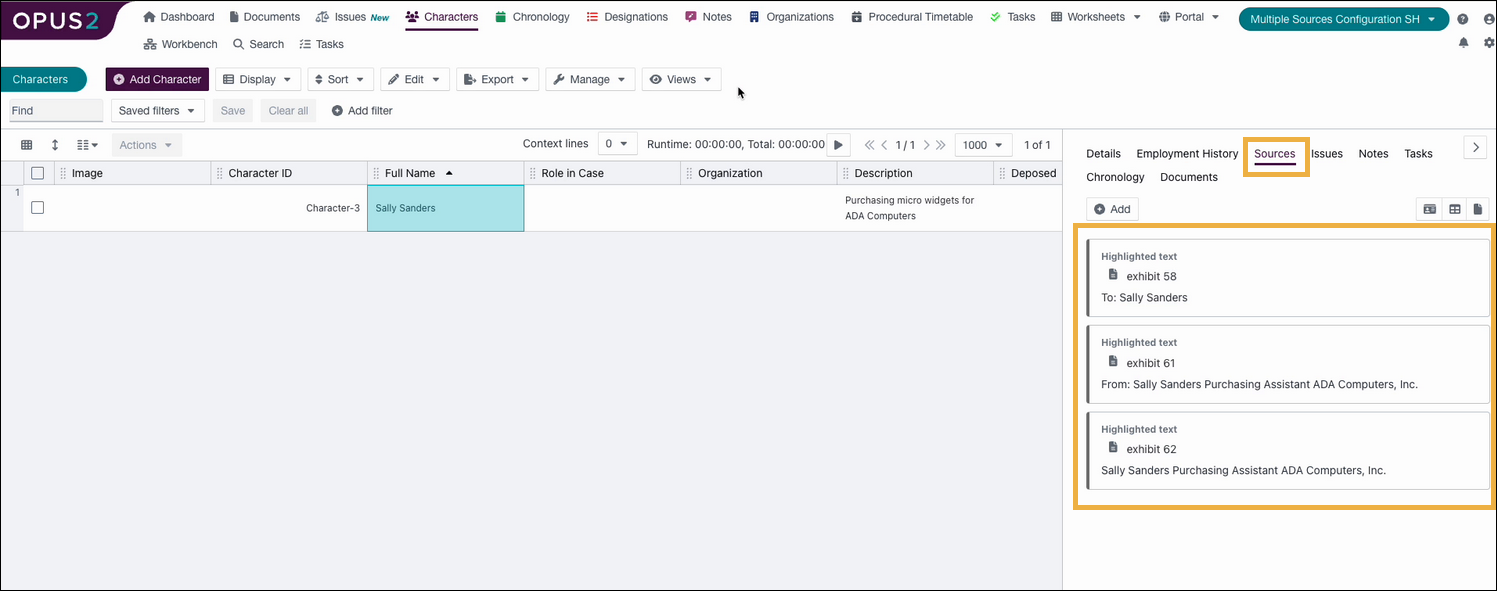
Repeat this check on the Chronology and Organisations worksheets to confirm everything is working as expected.
Note: Multiple sources can also be captured without merging records, and this configuration supports that scenario too.
Related links
Related documentation
Opus 2 has help information accessible within the application; click the question mark and then select Documentation in the upper-right area of the platform. You can also access the documentation at: Opus 2 Support.
How to contact us
To contact us about the documentation, or if you have any other questions or issues about Opus 2 solutions, contact Opus 2 Platform Support by emailing Opus 2 Platform Support.