
| Minimum Software Version | 8.18.10 |
| Solution(s) | Cases International ✓ Cases US ✓ Institutions ⨉ Counsel ✓ |
Explains how to create, apply, and manage Quick Actions for rapid, repeatable record creation from highlighted text in documents and transcripts.
Quick Actions streamline repetitive record creation when annotating documents or transcripts. Once configured, they allow users to apply a predefined action — such as creating a note with preset values — using a single selection or a simplified dialog flow. Quick Actions are private to the individual user and are accessed from the pin icon in the annotation toolbar.
Note: Quick Actions created in the Document Viewer apply only to documents. Quick Actions created in the Transcript Viewer apply only to transcripts.
Creating a Quick Action
- Open a document or transcript in the viewer.
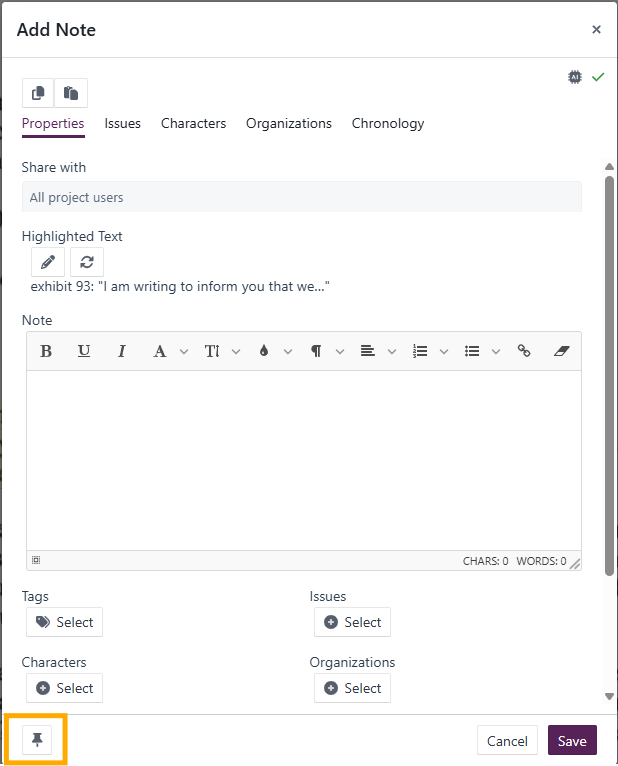
- Highlight text to add it to a worksheet (for example, to create a note). The Add Record dialog opens.
- Complete the relevant fields for the record type.
- Before selecting Save, select the pin icon to open the Quick Actions dialog.
- In the Quick Actions configuration dialog, complete the following:
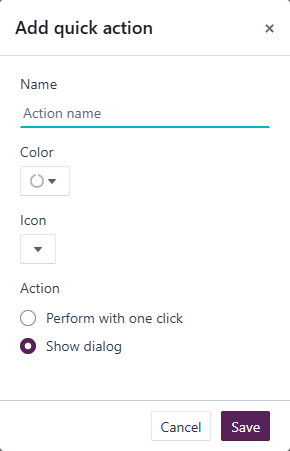
- Enter a name for the action.
- Choose a colour.
- Select an icon (optional).
- Choose an Action type:
- Perform with one click – Saves and creates the record automatically without any further input. Useful for records that should be identical across highlights.
- Show dialog – Displays the Add Record dialog before saving. Useful for records that require variable data.
- Select Save.
Once saved, the Quick Actions toolbar appears in the annotation toolbar. Quick Actions can be reordered or deleted from the toolbar.
Example: Create a Quick Action for a frequently used note type so that each highlight automatically generates an identical note with one click.
Applying a Quick Action
There are two ways to apply a Quick Action.
Option 1: Highlight first
- Highlight the desired text.
- Select the required Quick Action button.
Option 2: Select action first
- Select the Quick Action button to activate it.
- Highlight the desired text.
- Continue highlighting additional passages while the Quick Action remains selected.
If the action is set to Show dialog, the Add Record dialog appears and requires Save to be selected. If the action is set to Perform with one click, the record is created automatically without additional confirmation.
Example: Apply the same note Quick Action across multiple passages of a document by keeping the action selected and highlighting each passage in turn.
Managing Quick Actions
Quick Actions are user-specific and are not shared with other users. From the toolbar, users can reorder and delete Quick Actions.
Quick Actions cannot be edited. To change an action, delete it and create a new one.
Related links
Related documentation
Opus 2 has help information accessible within the application; click the question mark and then select Documentation in the upper-right area of the platform. You can also access the documentation at: Opus 2 Support.
How to contact us
To contact us about the documentation, or if you have any other questions or issues about Opus 2 solutions, contact Opus 2 Platform Support by emailing Opus 2 Platform Support.