| Minimum Software Version | Spring26 |
| Solution(s) | Hearings ⨉ Cases International ✓ Cases US ✓ Institutions ⨉ Counsel ✓ |
The Stamps feature allows for the creation and application of bespoke stamps. Stamps are configurable collections of document metadata that can be positioned and styled to comply with US and UK legal workflows.
Stamps includes:
- A flexible and intuitive stamp builder, enabling you to easily create and customise stamps with concatenated fields, and helping you to design consistent, tailored stamps.
- Real-time preview to make stamp setup clearer and more predictable.
- Consistent stamp application and removal across documents, and collections, including the ability to remove a specific stamp.
- Metadata fields remain supported (as in Legacy Stamps), with more focused styling controls to prioritise consistent output between the platform and exports.
You can add any and all document metadata to a stamp, as well as text and images. Stamps can still be added to individual documents or collections.
TABLE OF CONTENTS
Creating a stamp
To create a new stamp, do the following:
- Select the Manage drop-down menu.
- Select Manage stamps.
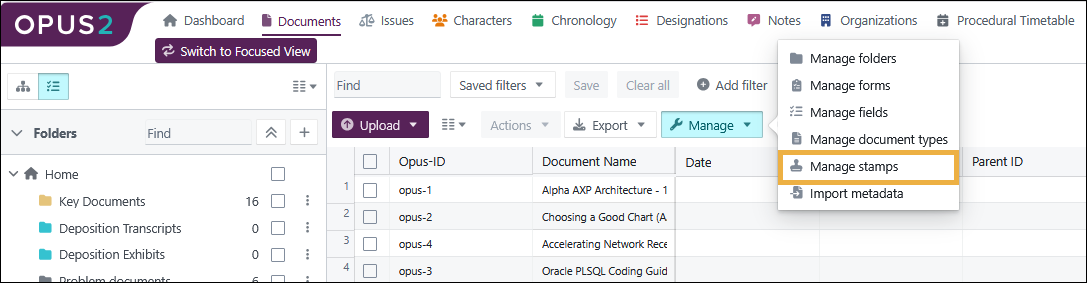
The Manage stamps dialog open.
- To create a new stamp, select +Create stamp.
The Create stamp dialog box opens with the stamp builder empty.
 There are four tabs used for stamp creation named General, Content, Layout, and Positioning. Work through the tabs left to right to create your completed stamp. As you select options, you see your stamp being built in the Stamp preview on the right side. Select from Stamp only or On page to change your preview as you work.
- Choose your options from the General tab:
| Option | Description |
Stamp name | Name your stamp so you can easily locate it in future. If your firm has a stamp naming policy, adhere to it. |
Font | Select your preferred or firm's choice of font from Arial, Times New Roman or Courier. |
| Unit | Choose from millimetres. Points or Inches. Units are needed when determining stamp position on the page. |
- Choose your options from the Content tab:
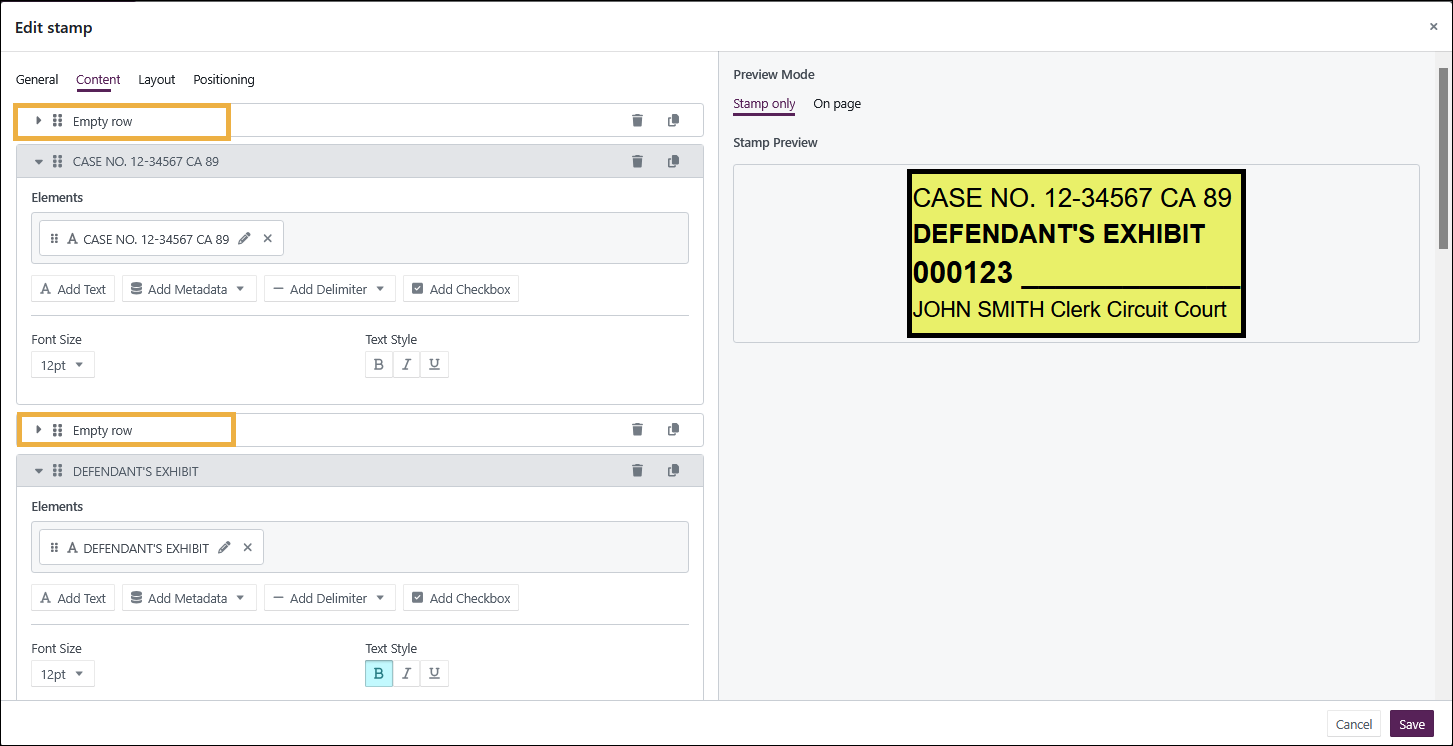
You can add multiple rows to a stamp and, as shown above, you can add empty rows in order to add space between rows of text. For each row in the stamp, select your choice of text, metadata, delimiters, checkboxes, and lines.
Option | Description |
|---|---|
Elements: Add text Add metadata Add delimiter Add checkbox | These options allow you to add static custom text, metadata from your documents, delimiters, and checkboxes. Any of the metadata fields that can be applied to your documents can be added to your stamp. When you apply the stamp to a document, it retrieves the relevant metadata for each document to match the metadata fields that you have added to the stamp. After a row has been created for a stamp, you can use the 6 dots to drag it, the trash can to delete the row, or you can duplicate the row. |
| Alignment | Select between left, centre, or right. |
| Text style | Choose from one or more styles: bold, italic, and underlined. |
| Font size | Select a font size from the dropdown list. |
| + Add row | Select to add another row of stamp content. |
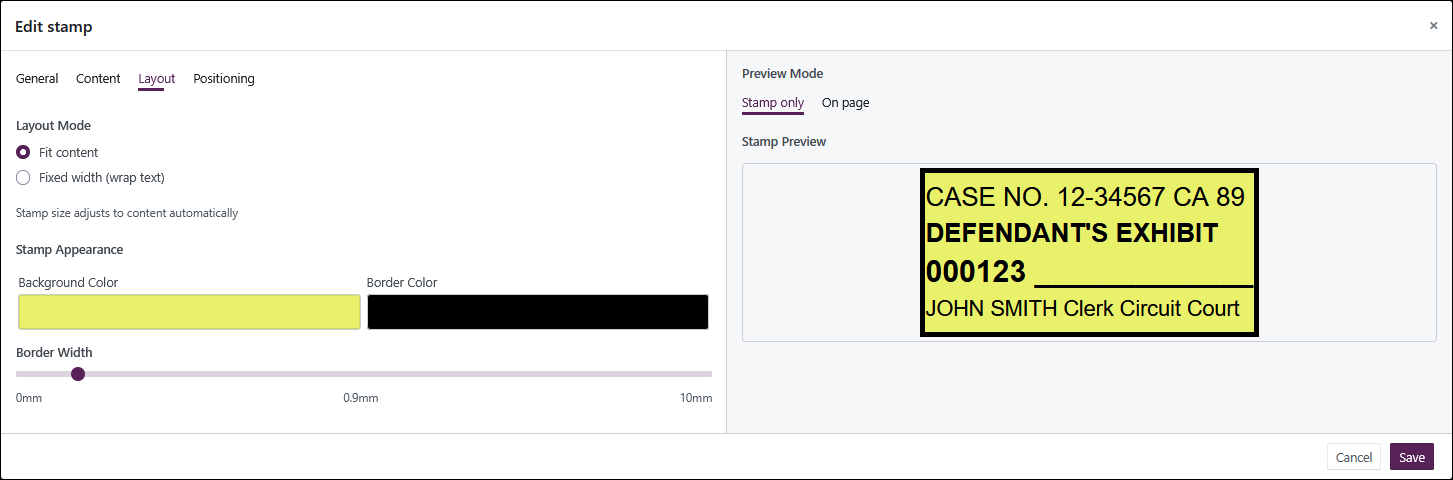
- Choose your options from the Layout tab:
Option | Description |
|---|---|
| Layout mode: Fit content Fixed width | Choose from: Fit content - The stamp changes size automatically to fit your content. Fixed width - You determine the maximum stamp size and the text wraps to fit. |
| Background colour | Select the background colour using the mouse or enter your firm's brand colour using the RGB notation. |
| Border colour | Select the border colour using the mouse or enter your firm's brand colour using the RGB notation. |
| Border width | Drag the slider to increase or decrease the width of the border around the stamp. |
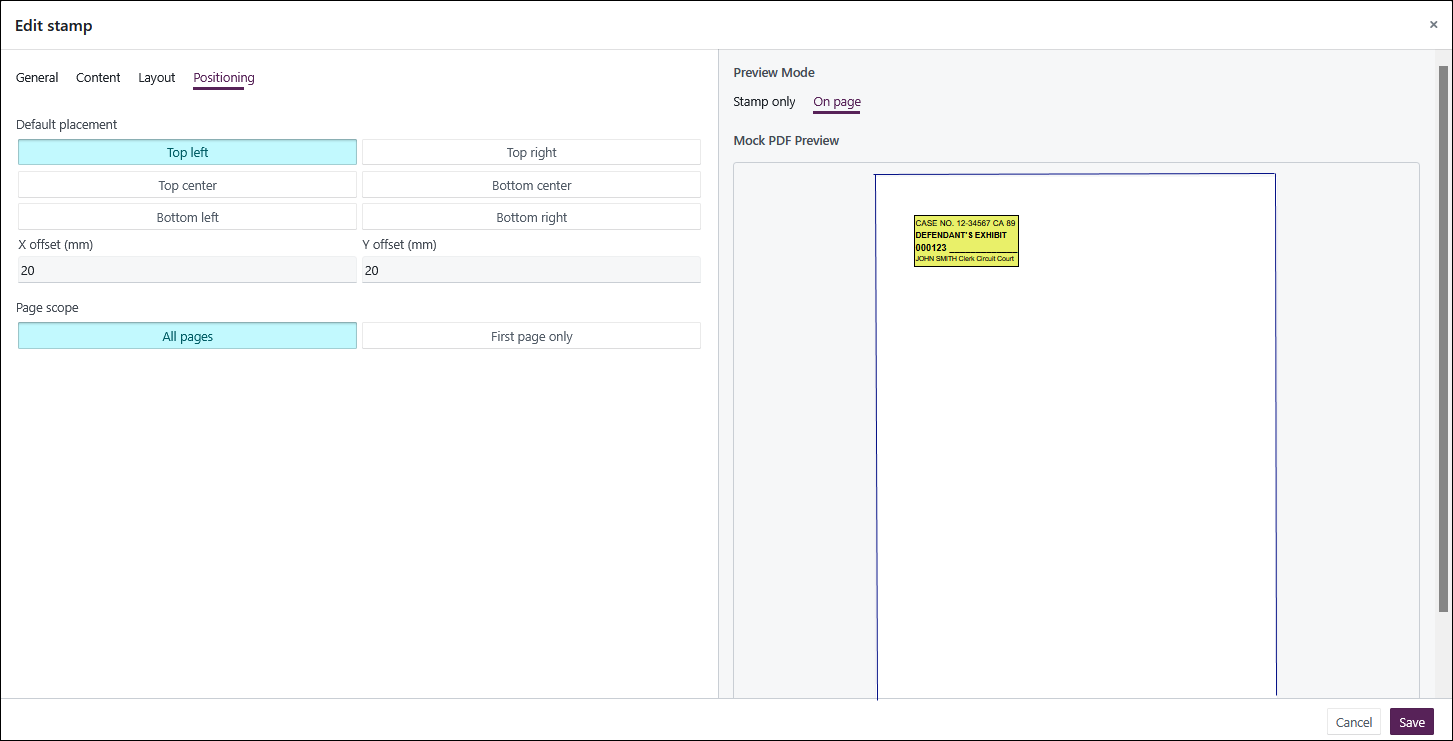
- Choose your options from the Positioning tab:
| Option | Description |
|---|---|
| Default placement | Choose from Top left, Top right, Top centre, Bottom centre, Bottom left, Bottom right. |
| X and Y offset (mm) | Horizontal and vertical offset allows the user to set a white space between the border of the page and the border of the stamp. |
| Page scope | Choose from All pages to place the stamp on all pages of the document or First page only to place it on just the first page. |
- Select Save stamp.
Sorting and filtering stamps
- Select the Manage drop-down menu.
- Select Manage stamps.

The Manage stamps dialog opens.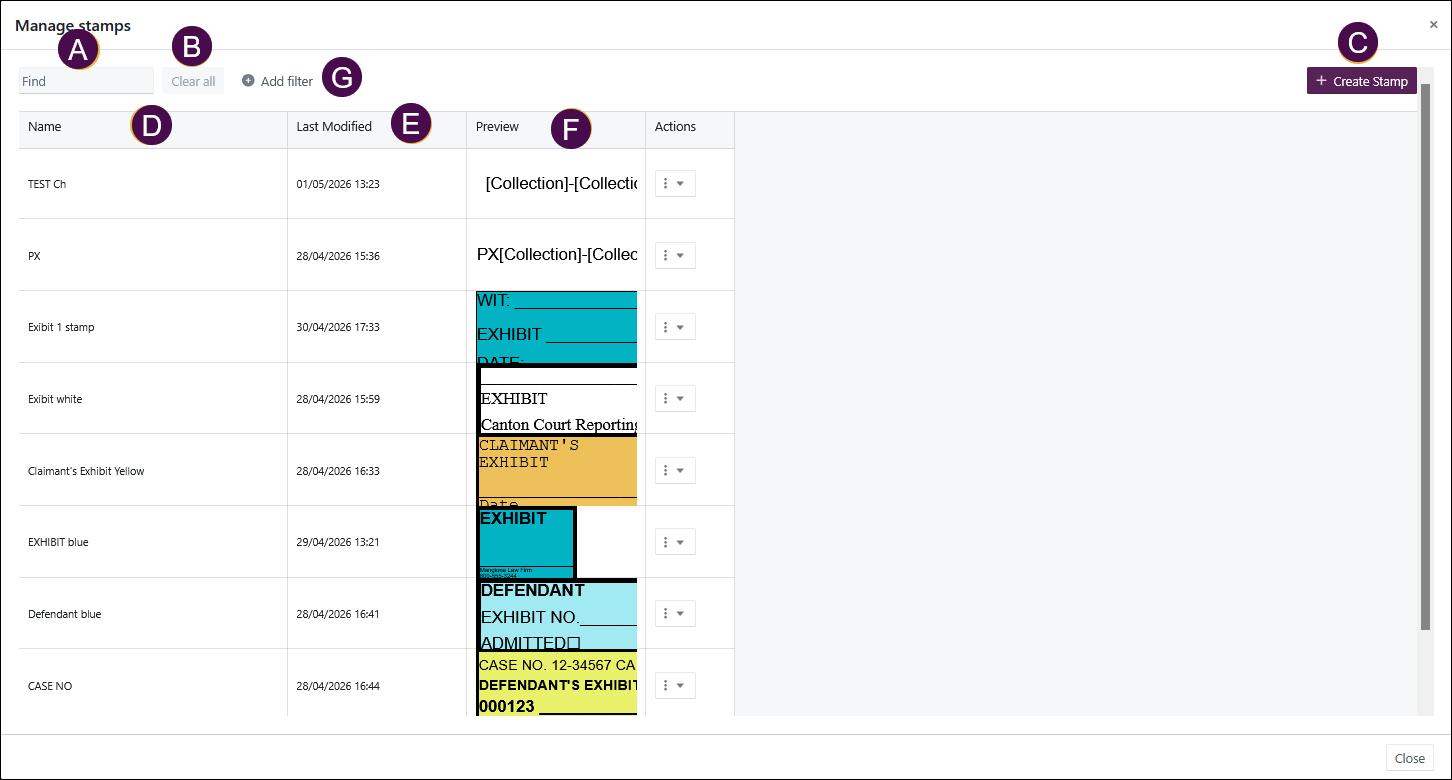
- Filter by typing a name to find a stamp.
- Clear all filters.
- Select to create a new stamp.
- Select column heading to order by ascending or descending order.
- Select column heading to order by ascending or descending order.
- Select column heading to order by ascending or descending order.
- Select Add filter > Name to open advanced filtering by name or several names. Add one name to filter or select Bulk Add to filter on several names as shown below:
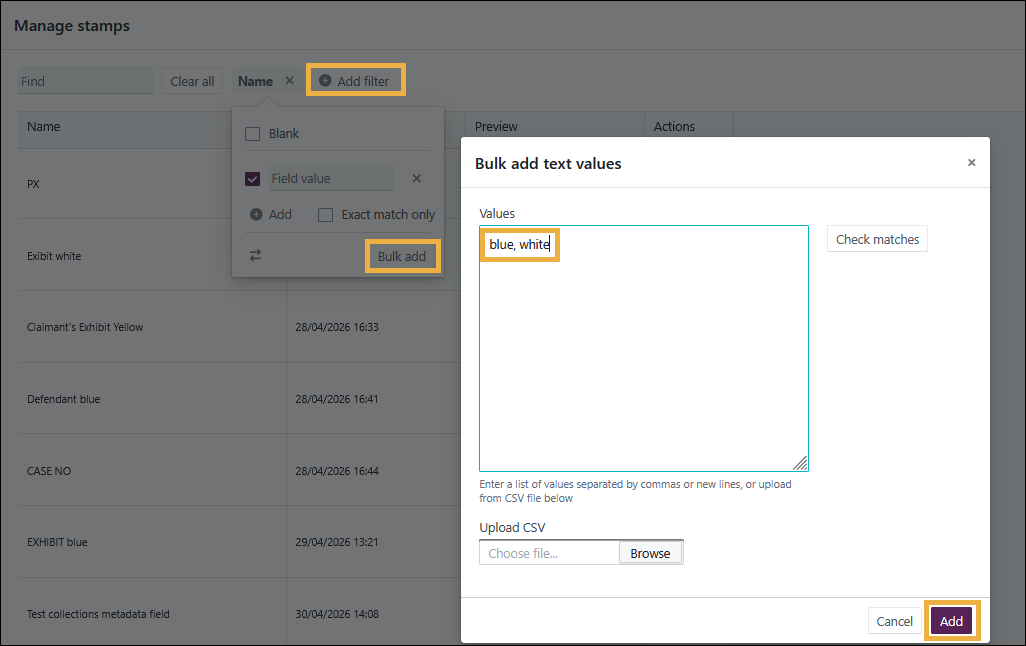
You can filter on a list of stamp names separated by commas, new lines, or uploaded via a .CSV file.
The names you filter on are treated as wildcard searches, for example *white* unless you select Exact match only, in which case you would have retrieved no documents in this instance. instead of the three shown.
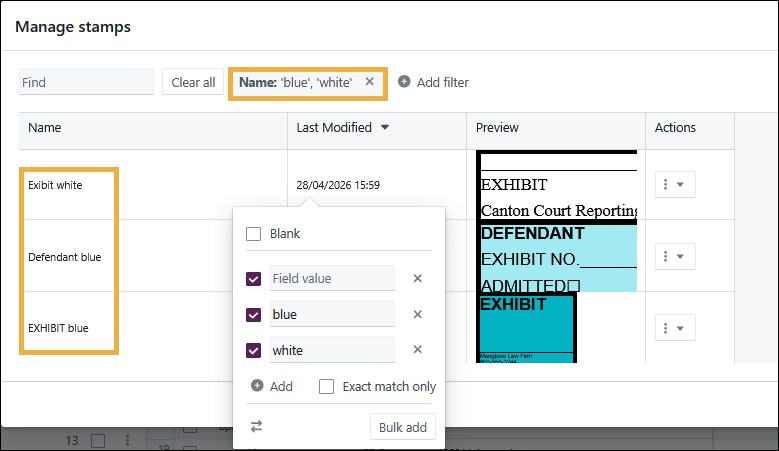
The double arrow icon reverses the selection so in this case, it would search for all stamps with names NOT containing *blue* or *white*.
h. Select Add filter > Last modified to filter by a range of date filters as shown:
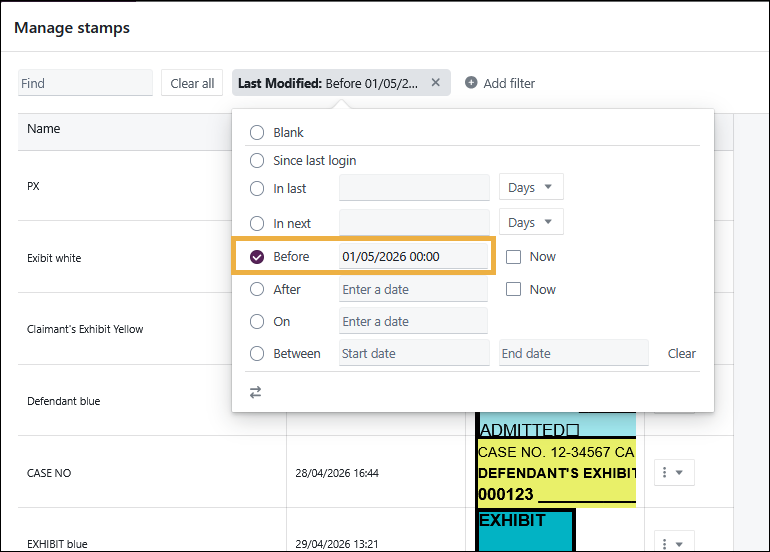
The results appear as soon as a date is selected as part of the filter.
Editing existing stamps
To edit an existing stamp, do the following:
- Select the Manage drop-down menu.
- Select Manage stamps.

- To edit a stamp, select the 3-dot kebab menu alongside your chosen stamp, then select Edit.
 The Edit stamp dialog box opens showing your stamp with its currently selected options.
- To copy a stamp, select Copy as. This creates a new stamp.
- To delete a stamp, select Delete.
- To edit or add new information, follow the steps in Creating a stamp above. For each row in a stamp, you can delete by selecting the trash can, copy the row, or move the row by grabbing 6 dots and dragging it.
- To remove an element text, metadata, delimiter, or checkbox. select the X on the element.
- Select Save stamp when editing is complete.
Related articles