
| Minimum Software Version | 8.16.3.1 |
| Solution(s) | Hearings ⨉Cases International ✓ Cases US ✓ Institutions ⨉ Counsel ✓ |
Explains how to use the Issues worksheet to identify, manage, and track legal, factual, and other issues in dispute in a case, including creating issues, linking evidence, visualising, filtering, and exporting.
The Issues worksheet allows users to identify, manage, and track the legal, factual, and other issues in dispute in a case. Issues can be linked to key information including documents, notes, chronology events, characters, organisations (US only), sources, and tasks.
Note: The Issues worksheet is available for new projects only.
Opening the worksheet
Select Issues from the navigation bar.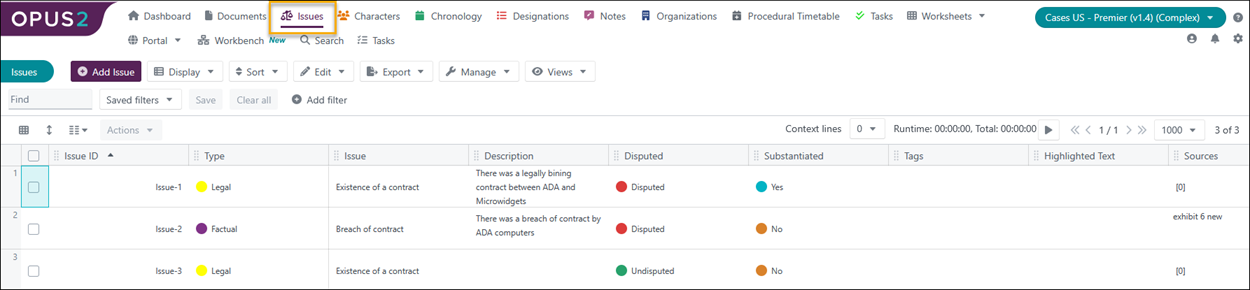
Creating an issue from the Issues worksheet
- Select Add Issue.

- Populate the fields in the dialog as described below.
Add Issue dialog
| Field | Description |
|---|---|
| Include on Portal | Premier tier only. Toggle to include the issue in a portal. |
| Issue | Enter a short phrase describing the issue. For example, Mitigation of Damages. |
| Type | The type of issue. Select from Legal, Factual, or None. This list can be modified to add other types (for example, Quantum) by selecting Edit > Edit worksheet > Fields > Type. |
| Description | A longer description of the issue with rich text formatting. For example, Whether ADA Computers, Inc. took reasonable steps to mitigate its damages. |
| Disputed | Whether the issue is disputed. Select from Disputed, Undisputed, or None. |
| Substantiated | Whether the issue has been substantiated by the case team. Select from Yes, No, or None. |
| Highlighted text | Select the pencil icon to associate specific passages of text from documents with the issue. Select the circular arrows icon to link to an annotation in a page or document. |
| Tags | Select one or more tags, then select Save. |
As you are creating the issue, or after it has been created, you can select evidence to support or rebut it.
Creating an issue from a document
- Open the document in the Document Viewer.
- Highlight the text that forms the basis for the issue.
- Select the three-dot icon.
- Select Create Issue from the dropdown menu.
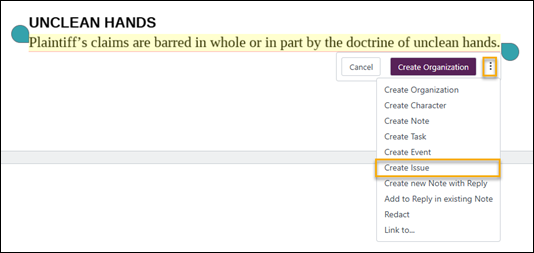
- Complete the fields in the Add Issue dialog as described above.
- Select Save
Linking evidence to an existing issue
The following types of information can be linked to an issue:
- Characters
- Chronology events
- Sources
- Notes
- Organisations (US only)
- Designations (US only)
- Tasks (Enhanced and Premier tier only)
To link information from a worksheet to an existing issue:
- Navigate to the relevant worksheet (for example, Characters).
- Select the record you want to link to an issue.
- The information pane opens on the right. Select the Issues tab.
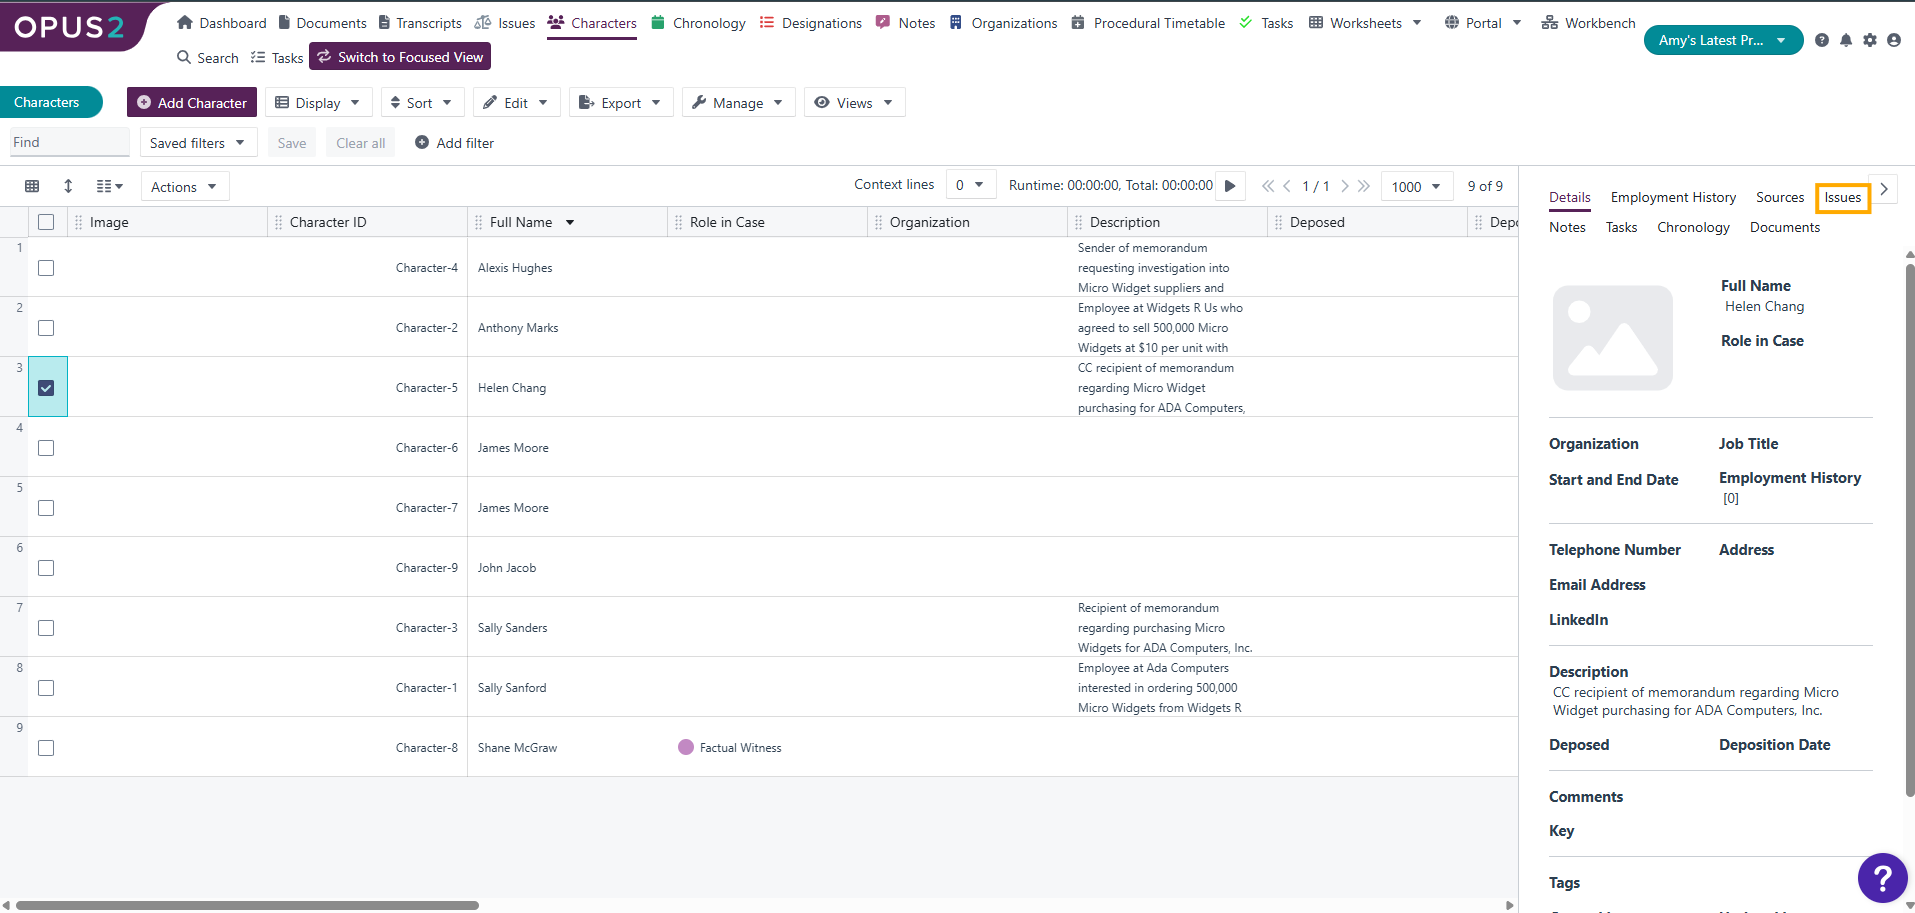
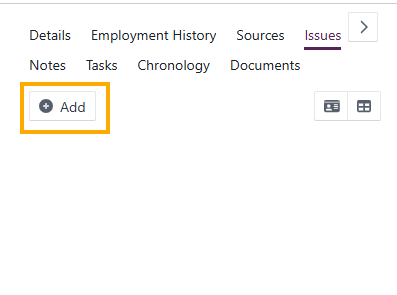
- Select Add.
- Select the issue to be linked by ticking the checkbox or create a new issue by selecting Create new.
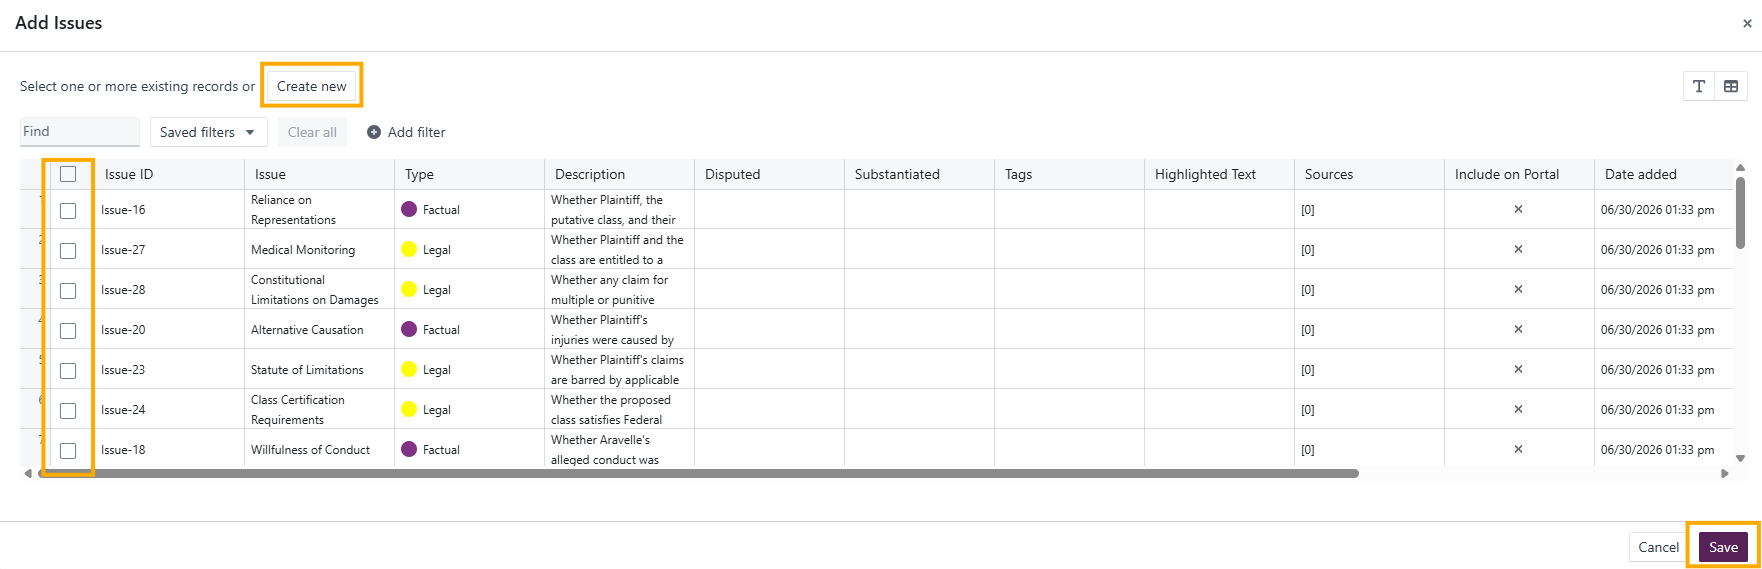
- Select Save.
The linked information is now visible on the issue in the Issues worksheet, and the issue entry is also visible from the originating worksheet.
Note: There are links from the Issues worksheet to all other worksheets and vice versa. For example, when creating a designation in the Designations worksheet, you can add it to an existing issue or create a new issue at the same time.
Visualising issues
Select Display > Cards to display issues in an interactive card view. Choose to view issues by Type (factual, legal, or other types added to the case), Disputed, or Substantiated.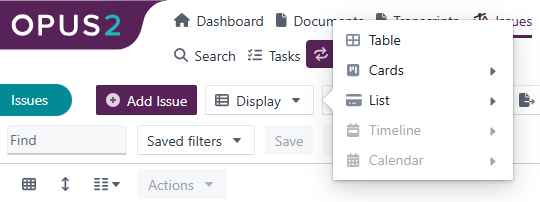
Sorting and filtering issues
Select any column heading to sort issues by that field.
Select Add filter to filter issues by a specific field, for example by issue type (factual or legal). Select additional filters to build a compound filter — for example, filtering by Type, Disputed, and Character simultaneously.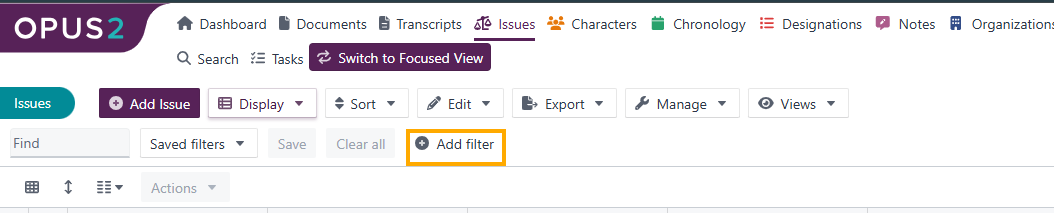
Removing an issue
- Select the issue using its checkbox.
- Select Actions > Delete.
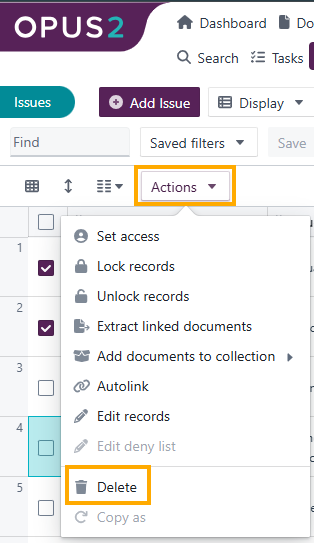
- Select Yes, move record to trash to confirm.
Exporting issues
- Select one or more issues using the checkboxes.
- Select Export and choose from the available options:
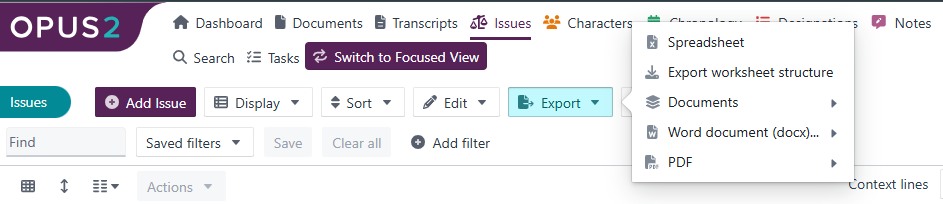
- Spreadsheet – Exports the issues as an CSV/Excel spreadsheet.
- Export worksheet structure – Exports the structure of the worksheet only, without the records.
- Documents – Exports the documents associated with the selected issues.
- Word document (.docx) – Exports the issues as a Word document.
- PDF – Exports the issues as a PDF.
Related links
- Characters worksheet
- Chronology worksheet
- Annotations and redactions
- Procedural timetable and tasks
- The Issues dashboard
- Exporting worksheet data
- Worksheet display options
- Importing worksheet data
Related documentation
Opus 2 has help information accessible within the application; click the question mark and then select Documentation in the upper-right area of the platform. You can also access the documentation at: Opus 2 Support.
How to contact us
To contact us about the documentation, or if you have any other questions or issues about Opus 2 solutions, contact Opus 2 Platform Support by emailing Opus 2 Platform Support.
The Issues worksheet provides users with the ability to identify, manage, and track the legal, factual, and other issues in dispute in a case. Issues can be linked to key information, including documents, notes, chronology, characters, organisations (US only), sources, and tasks.
Note: The Issues worksheet is available for NEW projects only.
Opening the worksheet
Select Issues from the navigation bar.
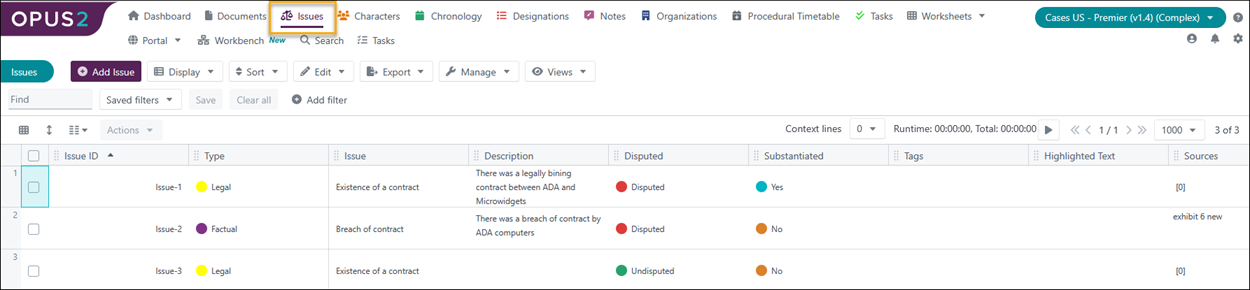
Creating an issue from the Issues worksheet
- Select Add Issue.
- Populate the fields in the dialog as described below:
| Add Issue dialog | |
| Include on Portal | Premier tier only: Toggle to include the issue in a portal. |
| Issue | Enter a short phrase describing the issue. For example, Mitigation of Damages. |
| Type | The type of issue. Select from Legal, Factual, or None. This list can be modified to add other types, for example, Quantum, by selecting Edit > Edit worksheet > Fields > Type. |
| Description | A longer description of what the issue entails with rich text formatting. For example, Whether ADA Computers, Inc. took reasonable steps to mitigate its damages. |
| Disputed | Whether the issue is disputed or not. Select from Disputed, Undisputed, or None. |
| Substantiated | Whether the issue has been substantiated by the case team or not. Select from Yes, No, or None. |
| Highlighted text | Select the pencil icon to associate specific passages of text from documents with the issue for quick reference and context. Select the circular arrows icon to link to an annotation in a page or a document. |
| Tags | Select one or more tags, then select Save. |
As you are creating the issue, or after the issue has been created, you can select evidence to support or rebut the issue.
Creating an issue from a document
- Open your selected document in the Document Viewer.
- Highlight the text that forms the basis for the issue.
- Select the 3-dot icon.
- Select Create Issue from the drop-down menu.

- Complete the information in the Add Issue dialog as explained above in Creating an issue from the Issues worksheet.
- On the Sources tab, link the Issue to supporting information, or upload documents and link them.
| Sources tab | |
| Add | If you have no sources, select Add to show the Source icons. |
 | Select the pencil to choose to find, filter, or navigate to a source document. Select the document and then Select. Alternatively, select the Upload icon to browse for a file or drag one in. Select the X to remove the source document selection. |
Linking evidence to an existing issue
The following types of information/evidence can be linked to an issue:
- Characters
- Chronology events
- Sources
- Notes
- Organisations (US only)
- Designations (US only)
- Tasks (Enhanced and Premier tier only)
To link information in a worksheet to an existing issue, do the following;
- Select Characters, for example.
- Select the character you wish to add to the issue.
The information pane opens on the right showing tabs for Details, Employment History etc.
- Select the Issues tab.

- Select Add.
- Select the issue to be linked to the character (in this example) by selecting the checkbox.
- Select Save

- Go back to the Issues worksheet and the information for that character has now been added to the chosen Issue.

From the Characters worksheet, the Issue entry can also be seen.
Note: There are links from the Issues worksheet to all the other worksheets and vice versa. For example, from the Designations worksheet when you create a designation, you can add the designation to an issue or create a new issue during the creation of that designation.

Visualising issues
- Select Display > Cards to display the issues in an interactive card view.
- Choose to views issues by Type (factual, legal, or other types added to your case), Disputed, or Substantiated.


Sorting and filtering issues
To sort the issues, select any of the column headings to sort on that field.
To filter the issues, select Add filter to filter the issues on a specific field, for example, by issue type (factual or legal).

Keep selecting more filters to make a compound filter, filtering by example on Type, Disputed, and Character as shown below: 
Removing an issue
- Select an issue by selecting its checkbox.
- Select Actions > Delete.
- Select Yes, move record to trash to confirm the deletion.
Exporting issues
- Select one or more issues using the checkboxes.
- Select Export > Choose an option.
You can export the Issues as an Excel spreadsheet, MS-Word Document or PDF, just export the worksheet structure, or just the documents associated with the Issues.
Related articles