
| Minimum Software Version | 8.18.10 |
| Solution(s) | Hearings⨉ Cases International ✓ Cases US ✓ Institutions ✓ Counsel ✓ Focused View⨉ |
Explains how to view a document or transcript in Opus 2 using the preview panel and the Document Viewer, and outlines the panels and tools available when reviewing content.
The Opus 2 Document Viewer lets you open, read, and interact with documents and transcripts directly from the Documents page. You can navigate between pages, search within the content, apply annotations and actions, and review associated notes. Content is first shown in a preview panel, and you can open it in the full Document Viewer for focused review.
When to use the preview panel and the Document Viewer
The Documents page offers two ways to access content. The preview panel gives a quick snapshot of a selected document or transcript, along with its metadata and relationships. The Document Viewer gives a more detailed view, with tools for searching, annotating, redacting, linking, and comparing.
The Document Viewer opens in a new browser tab by default, so you can review content without losing your place on the Documents page.
Some options in the Document Viewer, particularly in the Actions menu, depend on the content type. Options available for documents may differ from those available for transcripts. If an action described in this article does not appear for the item you are viewing, it is not available for that type.
Viewing a document or transcript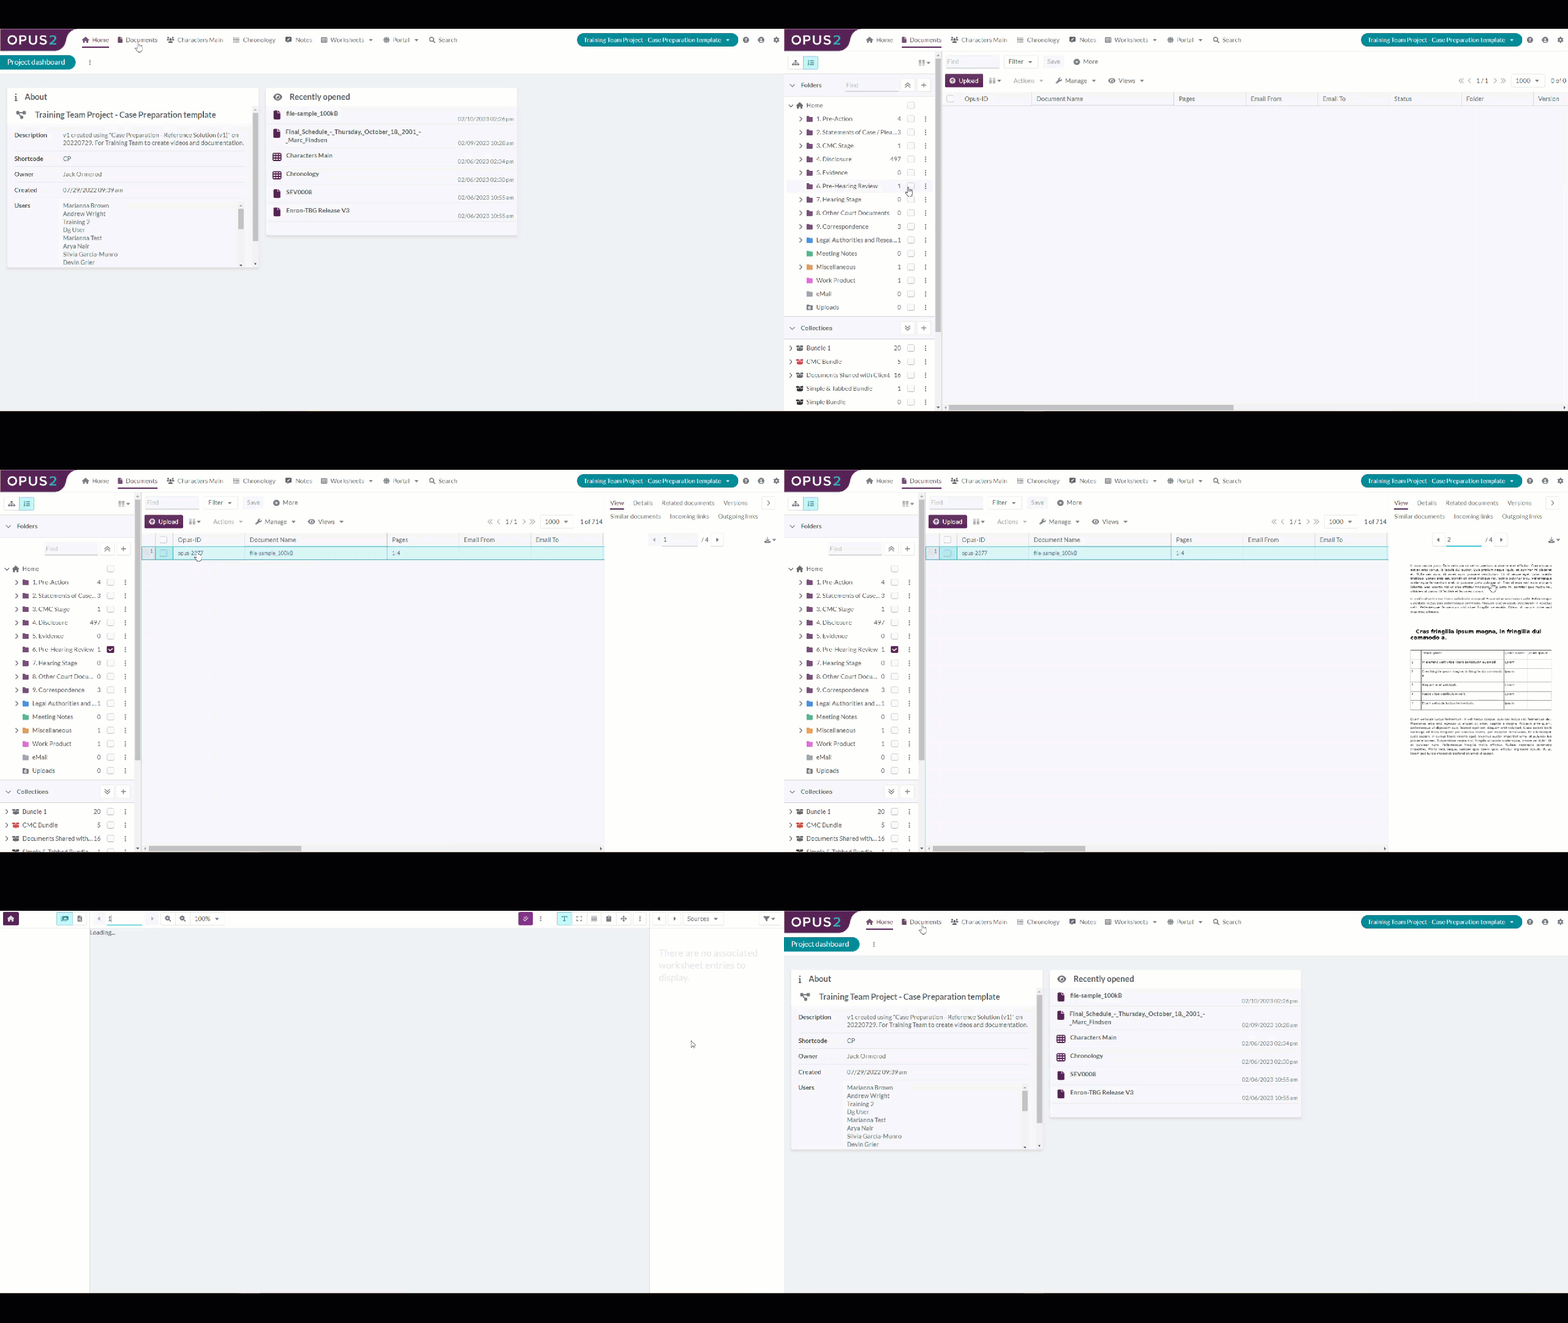
- Go to the Documents page.
- Select the document or transcript you want to view. If needed, use Find to locate it.
- Review the preview in the right-hand panel. The View tab is displayed by default.
- Use the page numbers at the top of the preview to move to the page you need.
- Select the page preview to open the item in the Document Viewer.
Example: Select a witness statement in the Documents table, go to page 3 in the preview, and select the page image. The statement opens in the Document Viewer at page 3.
Using the preview panel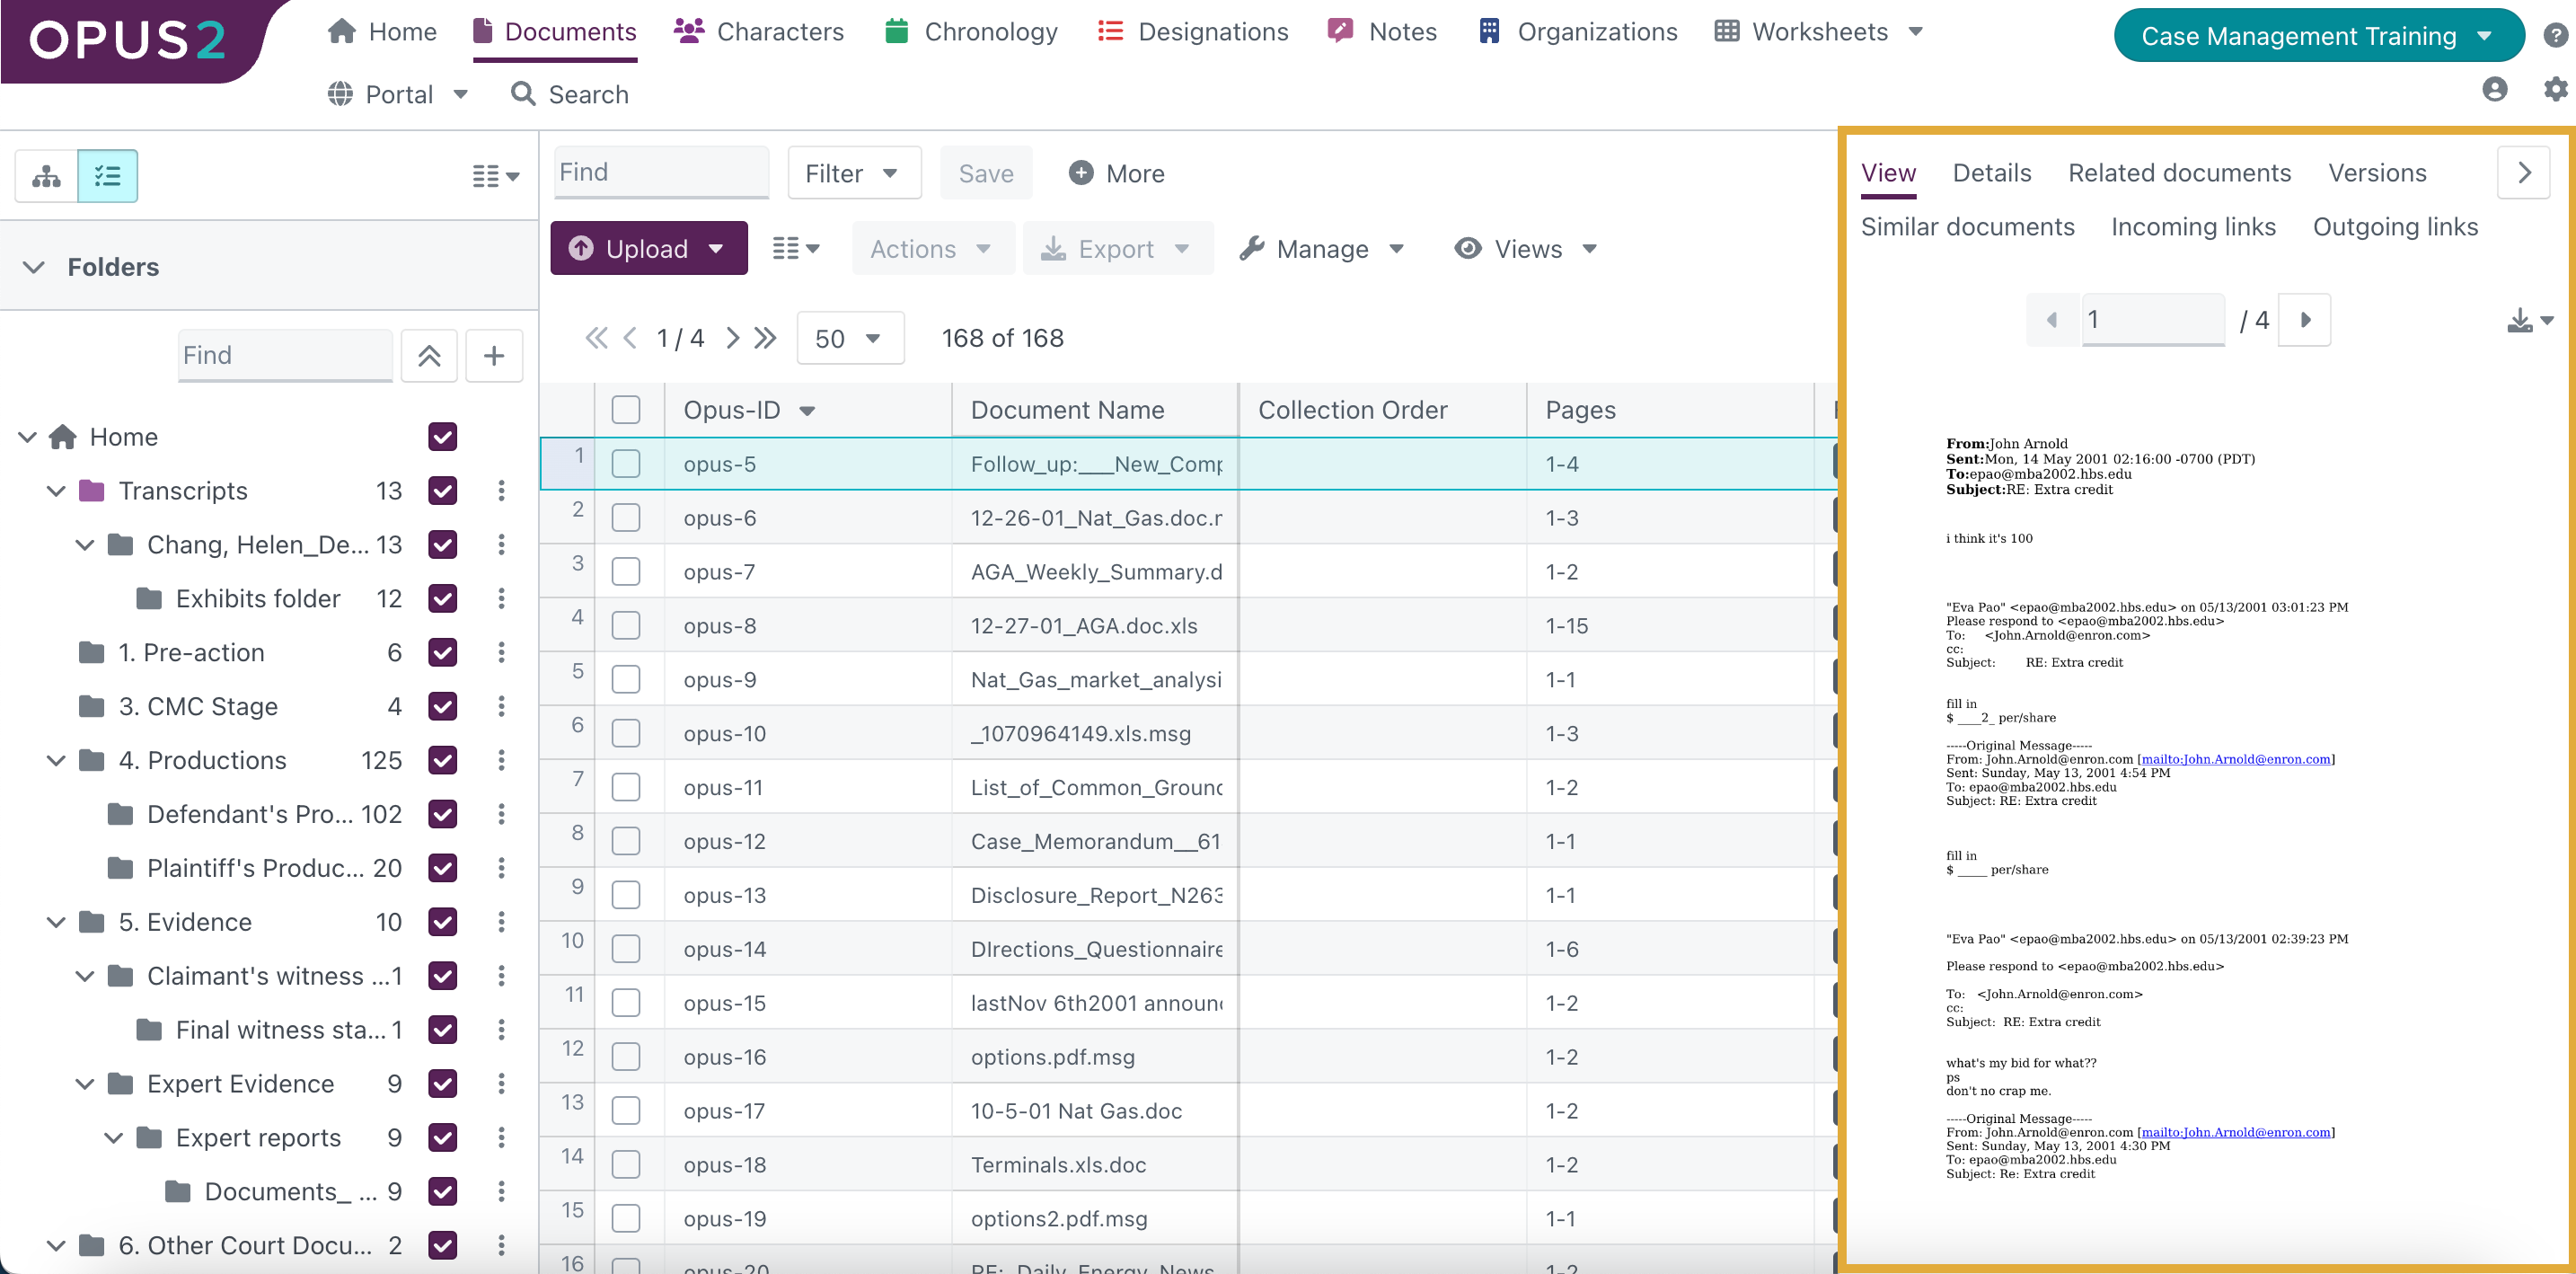
The preview panel has the following tabs.
| Tab | Description |
|---|---|
| View | Navigate through pages using the left and right arrows. Select the page image to open the Document Viewer. You can also download the item as the original file (for example, .doc) or as a .pdf file. |
| Details | View, and in some cases edit, metadata such as document type, Opus ID, name, collection, date, tags, description, file name, access, status, folder, version, size, and custodian. The fields shown depend on the content type. |
| Related documents | Shows items marked as related, also known as document families. The system generates relationships only for email attachments and redactions. You can create others, such as translations, duplicates, email threads, source formats, and custom relationships. Duplicates are not checked when you assign them, so only mark items as duplicates if they are. You can check for duplicates on the Files page. |
| Versions | Lists alternate versions if someone has replaced the file. A document in the platform is not tied to its uploaded file, so a replaced file keeps the same name and Opus ID even if the content is new. |
| Incoming links | Lists links from other documents to the item you are viewing. Select a link to open the related item. |
| Outgoing links | Lists links from the item you are viewing to other documents. Select a link to open the related item. |
| Transcript details | Shows information specific to the transcript. This tab is available for transcripts only, and appears for all transcripts uploaded using the transcript uploader. It does not appear for documents. The Text section shows the total pages, the main content page range, the first page number, and the number of pages with timecodes. The Media section shows the file name, start time, and length of the media file. It appears only if media has been uploaded with the transcript text and the pages carry timecodes. |
Understanding the Document Viewer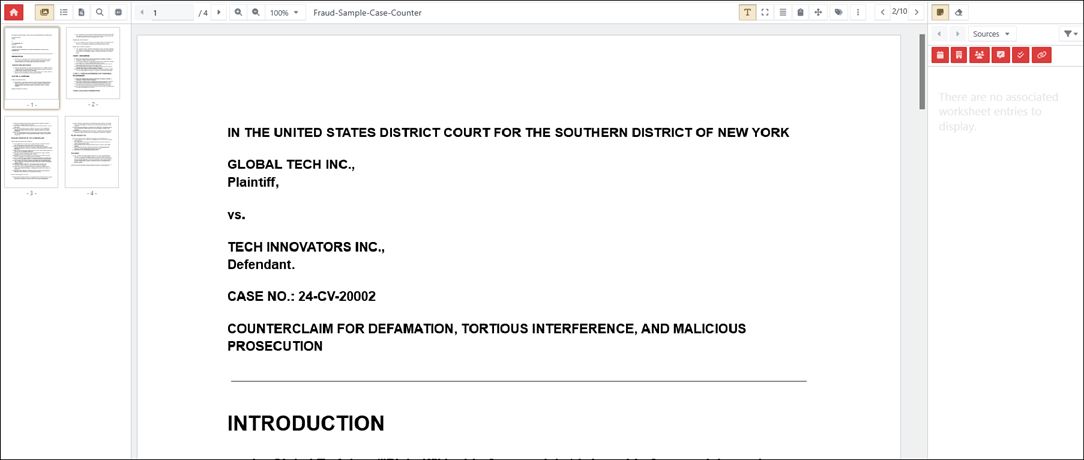
The Document Viewer has three panels, each with its own toolbar. You can resize the panels by dragging the vertical dividers.
Left-hand panel
The left-hand panel helps you navigate and locate content. Its toolbar includes the following controls.
| Control | Description |
|---|---|
Return to Documents page | Takes you back to the Documents page. |
Thumbnails | Shows each page as a scrollable thumbnail. Select a thumbnail to open that page. Dots or a number on a thumbnail show where annotations exist, so you can quickly spot the most heavily annotated pages. |
Word index | Lists the words that appear in the content, with the page numbers where each appears. Expand a word to see every instance, and select an instance to open the page with the word highlighted in context. Use the Find bar at the top to locate a specific term. Select the three-dot button next to a word to redact every instance of it or to clear its redactions. Common words, such as articles, prepositions, and pronouns, are excluded from the index. |
Search | Searches for specific text within the item. Results are highlighted and can be navigated in sequence. |
AI | Opens AI Analysis tools, including summary, query, and entity extraction. See Accessing AI Analysis for more information. |
Words excluded from the index:
‘--', ‘a’, 'about', 'act', 'all', 'am', 'an', 'and’, 'any', 'are', 'as', 'at', 'be', 'because', 'been', 'but', 'by', 'can', 'case', 'certainly', 'claim', 'could', 'court', 'defence', 'did', 'do', 'each', 'fact', 'facts', 'for', 'friend', 'from', 'go', 'got', 'had', 'has', 'have', 'he', 'her', 'him', 'his', 'hot', 'how', 'I', 'i', 'id’, 'if', ‘im’, 'i'm', 'in', 'indeed', 'is', 'issue', 'it', 'just', 'justice', 'law', 'laws', 'lord', 'made', 'make', 'may', 'me', ‘mr’, 'mrs', ‘ms’, 'my', 'new', 'no', 'not', 'now', 'of’, 'off', 'on', 'one', 'only', 'or', ‘our’, 'out', 'other', 'page', 'point', 'put', 'q', 'right', 'rule', 'said', 'say', 'says', 'she', 'simply', 'so', 'some', 'sorry', 'state', 'submission', 'submissions', 'such', 'take', 'tell', 'than', 'that', ’the’, 'their', 'them', 'then', 'there', 'these', 'they', 'things', 'think', 'this', 'those', ‘to’, 'top', 'tort', 'two', 'under', 'unlawful', 'up', 'us', 'use', 'very', 'view', 'want', 'wanted', 'was', 'wasn't', 'we', ‘well’, 'were', 'why', 'what', 'when', 'where', 'whether', 'which', 'while', 'who', 'will', ‘with’, 'within', 'without', ‘word’, 'words', 'would', 'yes', ‘you’, ‘your’
Centre panel
The centre panel displays the content for reading, review, and interaction. Its toolbar includes the following controls.
| Toolbar position | Control | Description |
|---|---|---|
| Left side | Page navigation | Moves between pages in the item. |
| Left side | Zoom in and zoom out | Zooms in and out, with options to change the scale. |
| Right side | Text select tools | Select text to annotate, either following the flow of text or using a rectangular box that picks up parts of multiple lines at once. |
| Right side | Area select | Select a defined region to annotate, for example an image or chart that cannot be selected as text. |
| Right side | Select text within a rectangular box | Draws a rectangular box and highlights the text inside it. Use this to select small parts of multiple lines at once. |
| Right side | Copy text | Select text to copy to the clipboard. |
| Right side | Pan | Click and drag on the page to move around. |
| Right side | Tag | Applies a tag to organise the item. |
| Right side | Navigate between items | Moves between items in the selected folder. |
| Right side | Additional options | Opens Details, Find, Parallel comparison, Compare with, Actions, Open new document, and Versions (see below). |
Right-hand panel
The right-hand panel shows content overlaid on the item, including notes, annotations, links, and redactions. Select an overlay in the centre panel to highlight the matching entry in the right-hand panel. Select an entry in the right-hand panel to scroll the centre panel to the relevant page and highlight the text or region.
The panel toolbar includes the following controls.
| Control | Description |
|---|---|
Annotations | Shows and creates annotations. |
Redactions | Shows and creates redactions. |
Navigate overlaid content | Moves between the content overlaid on the item. |
View by worksheet or version | Shows overlaid content according to the worksheet or version in which it was created. |
Find and filter | Finds and filters overlaid content, which also reduces the number of visible notes. |
Example: Select a note in the right-hand panel. The item opens at the referenced paragraph with the associated text highlighted.
Additional options
The Additional options menu in the centre panel toolbar contains different options for documents and transcripts.
Additional options for documents
| Option | Description |
|---|---|
| Show annotation labels | Turns annotation labels on or off. |
| Details | Opens a dialog box showing the same details as the preview panel's Details tab. |
| Find | Searches for text within the document. |
| Parallel comparison | Opens two documents side by side for manual comparison. You can open the same document twice to compare different sections. |
| Compare with | Compares two documents in one view. Blue highlights show content that appears only in the document you are comparing from (A). Red highlights show content that appears only in the document you are comparing to (B). Use the icon at the top right to switch the comparison direction. |
| Open links | Opens the links associated with the document. |
| Actions | Opens further options for interacting with the document (see below). |
| Open new document | Lists the folders and documents you can access. Selecting one opens it in the same tab. |
| Versions | Lists alternate versions that you can select to view. |
Additional options for transcripts
| Option | Description |
|---|---|
| Show text highlights | Turns text highlights on or off. |
| Show annotation labels | Turns annotation labels on or off. |
| Show timecodes | Turns timecodes on or off in the transcript text. |
| Transcript details | Opens a dialog box showing the same text and media information as the preview panel's Transcript details tab. Select Save to keep any changes, or Close to exit the dialog box. |
| Designations | Opens the designations for the transcript. |
| Actions | Opens further options for interacting with the transcript (see below). |
Actions menu
The options in the Actions menu differ for documents and transcripts.
Actions for documents
| Action | Description |
|---|---|
| Add to | Adds the document to one of the following: Characters, Chronology, Issues, Organizations, Procedural Timetable, Tasks, Worksheet, Collection, or Canvas. Worksheet adds the document to an existing worksheet record or creates a new one. Collection adds the document to a collection, so you can make changes in the collection without affecting the source document. |
| Set access | Manages which users or groups can access the document. |
| Manage pages | Reorders, inserts, replaces, extracts, splits, and deletes individual pages, so you do not need to replace the whole document when only one page changes. |
| Download original (.pdf) | Downloads the original file without any redactions or annotations. |
| Download | Downloads the current view as a .pdf, including any added records. |
| Export document | Exports the document and associated work products, such as annotations and stamps, as selected in the export dialog. See Document exporting for more information. |
Actions for transcripts
| Action | Description |
|---|---|
| Add to worksheet | Adds the transcript to an existing worksheet record or creates a new one. |
| Add to collection | Adds the transcript to a collection, so you can make changes in the collection without affecting the source transcript. |
| Set access | Manages which users or groups can access the transcript. |
| Download original (.mdb) | Downloads the original transcript file. |
| Download | Downloads the transcript. |
| Manage media | Manages the media files associated with the transcript. |
| Download media | Downloads the media file associated with the transcript. |
| Export clips | Exports media clips from the transcript. |
| Export media with captions | Exports the media with captions. |
| Export transcript | Exports the transcript. |
| Import Designations | Imports designations into the transcript. |
Related links
- How to find documents using folders
- How to add a note on an area of a document
- Creating document and text-level links
- Accessing AI Analysis
Related documentation
Opus 2 has help information accessible within the application; click the question mark and then select Documentation in the upper-right area of the platform. You can also access the documentation at: Opus 2 Support.
How to contact us
To contact us about the documentation, or if you have any other questions or issues about Opus 2 solutions, contact Opus 2 Platform Support by emailing Opus 2 Platform Support.