
| Minimum Software Version | 8.18.10 |
| Solution(s) | Cases International ✓ Cases US ✓ Institutions ⨉ Counsel ✓ |
The Input Form portal component allows portal users to create new worksheet records directly from a portal page, enabling structured data entry into the platform.
The Input Form component provides a controlled way for portal users to add new records to an existing worksheet. Each input form must be linked to a destination worksheet that already exists within the project.
By default, portal users can populate all fields in the worksheet when creating a new record. To restrict or guide data entry, administrators can create a form in the Worksheet Editor that includes only the fields intended for portal user input. This ensures consistency, accuracy, and appropriate access control.
Step 1: Prepare Worksheet and Form
Before configuring the Input Form component:
- Ensure the destination worksheet has been created in the project.
- (Optional but recommended) Create a form in the Worksheet Editor containing only the fields portal users should complete.
Important:
A worksheet is mandatory. Forms must be created in advance to be selectable in the Input Form component.
Example:
Create a worksheet named “Client Submissions” and a form that includes only name, document description, and submission date fields.
Step 2: Add an Input Form Component
- Open the Portal Builder.
- Add the Input Form component to the desired portal page.
- Open the Properties tab to configure the component.
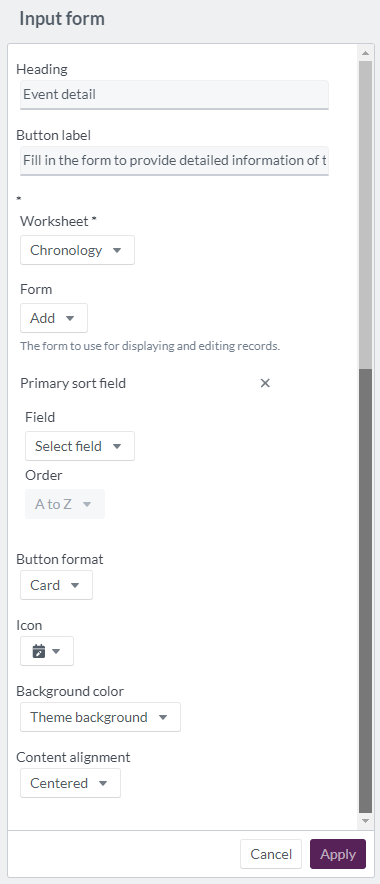
Step 3: Configure Input Form Properties
Configure the following options:
| Option | Explanation |
|---|---|
| Heading | Header text for the Input Form component (maximum 20 characters). |
| Button label | Text displayed on the Input Form button (maximum 100 characters). |
| Worksheet | Required. Select the destination worksheet. |
| Form | Select a preconfigured form to control which fields portal users can fill in. |
| Primary sort field: Field | Choose a field for primary sorting logic. |
| Primary sort field: Order | Set sort order as A–Z or Z–A. |
| Button format | Display the input form trigger as a button, large button, or card. |
| Icon | Choose an icon to represent the input form section. |
| Background color | Select a background color from theme options or define a custom color using a color wheel, hexadecimal, or RGB code. |
| Content alignment | Align the component left, center, or right. |
Example:
Configure an Input Form with the heading “New Entry” and a large button labeled “Add Record”, using a restricted form view.
Step 4: Portal User Input Experience
When portal users click the Input Form button:
- The Add Form dialog box for the selected worksheet opens.
- Portal users complete the available fields as defined in the form.
- The entry is saved directly to the designated worksheet upon submission.
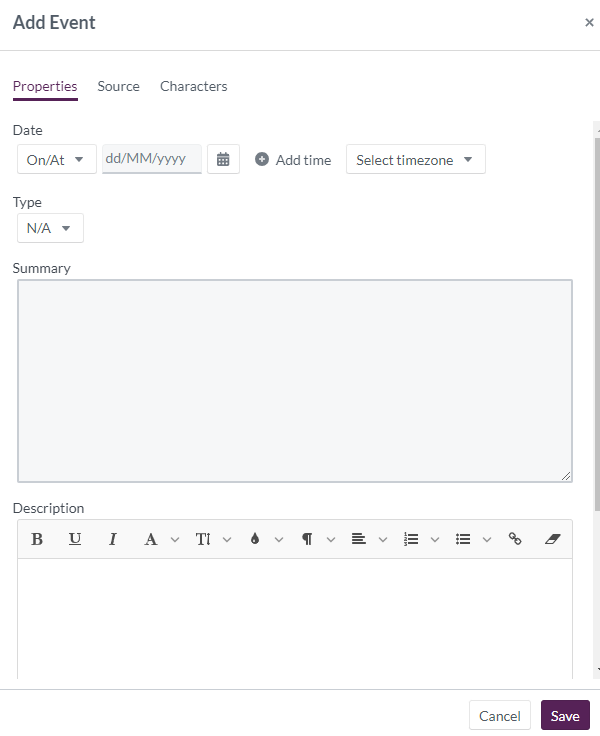
All newly created records follow the worksheet’s structure and validation rules.
Example:
A portal user submits a new client update, which is immediately saved as a new record in the “Client Submissions” worksheet.
Display example of 'input form' component:

Related Links (optional)
Use the Input Form component to streamline structured data collection from portal users while maintaining consistency and control through worksheet forms.