
| Minimum Software Version | 8.18.10 |
| Solution(s) | Cases International ✓ Cases US ✓ Institutions ⨉ Counsel ✓ |
The Documents Page portal component allows users to share documents with portal users using a full folder structure, enabling navigation, uploads, and document actions within a single, comprehensive view.
The Documents Page component provides a structured, folder-based document experience for portal users. Unlike the Documents or Folder components, this component allows portal users to navigate multiple folders and their contents in a hierarchical structure, closely mirroring how documents are organized within the platform.
Administrators can control which folders are visible, which metadata columns are displayed, whether uploads are allowed, and what actions portal users can perform on documents. This component is ideal for portals that require broader document access and interaction.
Step 1: Prepare Folders in the Platform
Before configuring the Documents Page component:
- Ensure that all folders to be shared have been created in the platform.
- Confirm that documents are stored within the relevant folders.
Important:
Only folders that already exist in the platform can be selected for display.
Example:
Create folders named “Correspondence”, “Evidence”, and “Filings” to represent document categories.
Step 2: Add a Documents Page Component
- Open the Portal Builder.
- Add the Documents Page component to the desired portal page.
- Open the Properties tab.
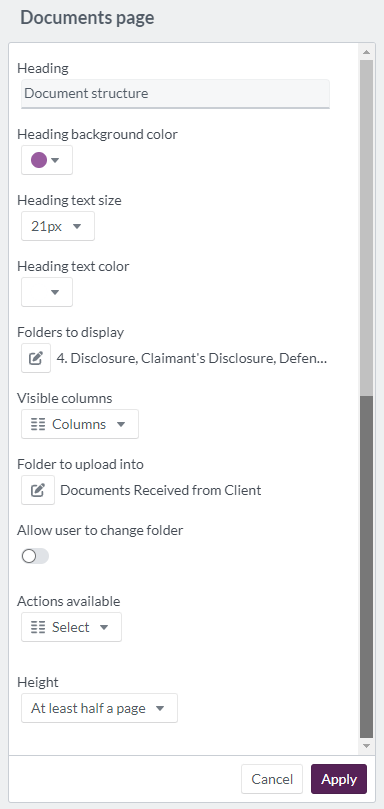
Step 3: Configure Documents Page Properties
Configure the following options in the Properties tab:
| Option | Explanation |
|---|---|
| Heading | Heading text for the Documents Page component (maximum 100 characters). |
| Heading background color | Select heading background color using a color wheel, hexadecimal, or RGB code. |
| Heading text size | Set heading text size between 12px and 72px. |
| Heading text color | Choose heading text color using a color wheel, hexadecimal, or RGB code. |
| Folders to display | Select the folders to share with portal users (must already exist). |
| Visible columns | Select metadata fields to display. If no columns are selected, documents will not be shown. |
| Folders to upload into | Select the folder where portal uploads will be stored. If not selected, files are saved in the platform’s Upload folder by default. |
| Allow user to change folder | Allows portal users to select a different upload destination folder. |
| Actions available | Choose which actions portal users can perform: delete, download original, download as PDF. |
| Height | Set the display area to fit to content, at least half a page, or at least a full page. |
Example:
Configure a Documents Page titled “Shared Case Documents” displaying correspondence and filings folders, with upload and download actions enabled.
Step 4: Portal User Document Navigation
When viewed by portal users:
- The heading appears at the top of the component
- A folder structure is displayed
- Users must click a folder to view documents inside it
Note:
If a parent folder contains no documents, no documents will be shown.
Only documents within the selected folders and matching the visible metadata configuration will appear.
Example:
A portal user clicks on the “Evidence” folder to view uploaded exhibits.
Step 5: Upload and Actions (If Enabled)
If uploading is enabled:
- Portal users can upload documents directly from the Documents Page
- Uploaded documents are stored in the configured folder, or the Upload folder by default
- If allowed, users can change the destination folder
If actions are enabled, portal users may:
- Delete documents
- Download original files
- Download documents as PDFs
Example:
A portal user uploads a new document to the “Correspondence” folder and downloads an existing file as a PDF.
Display example of 'documents page' component: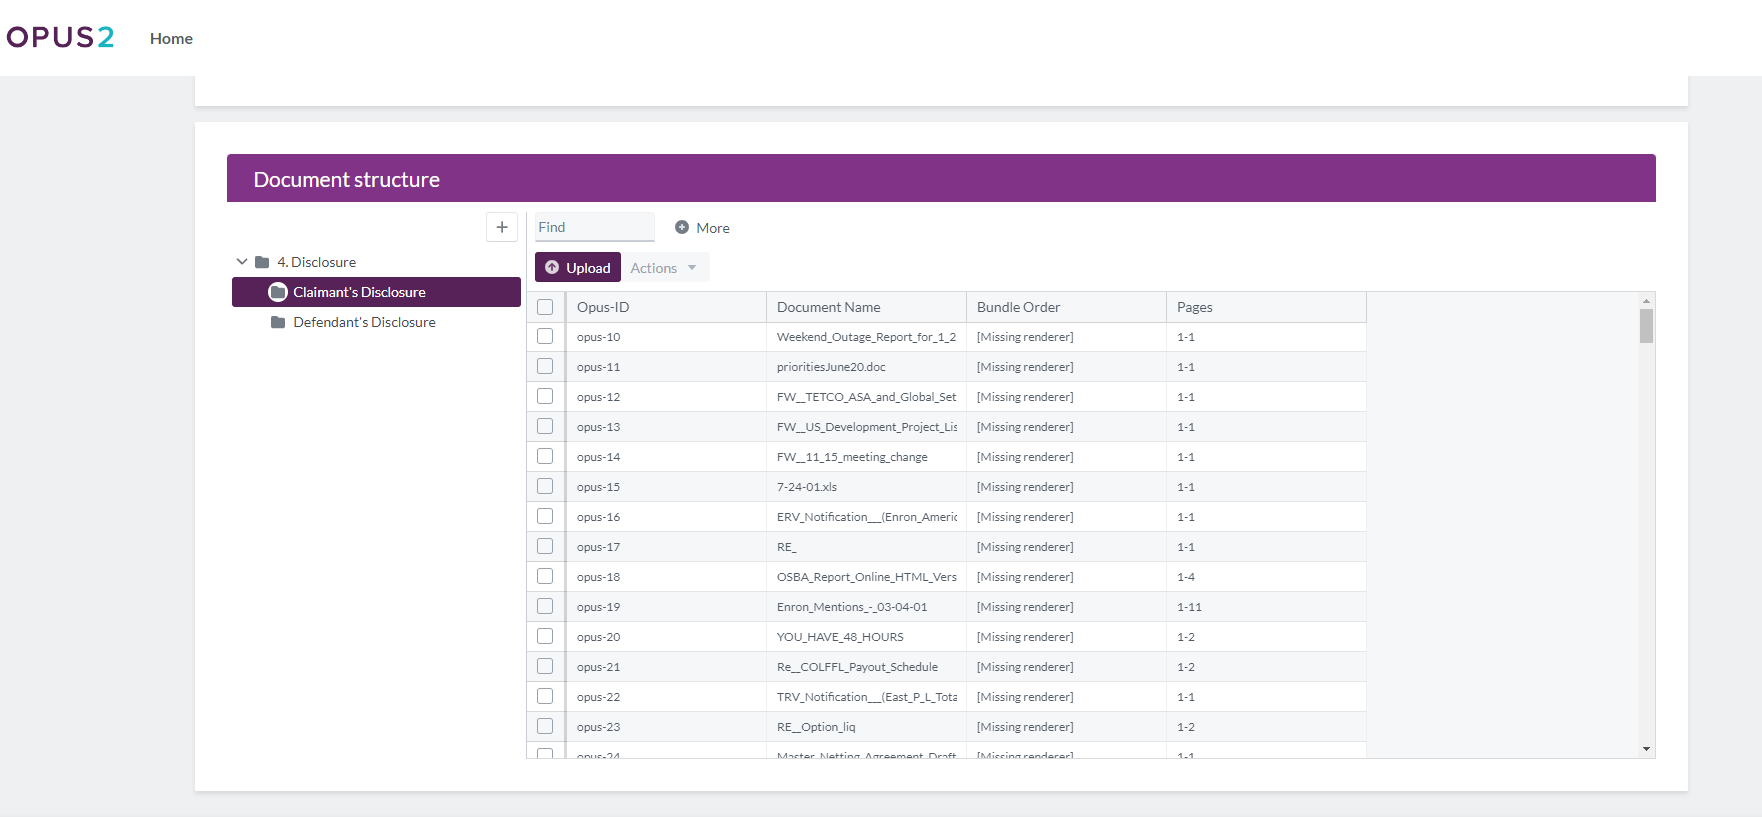
Related Links
Use the Documents Page component to provide portal users with a complete, folder-based document experience while maintaining control over visibility, uploads, and allowed actions.